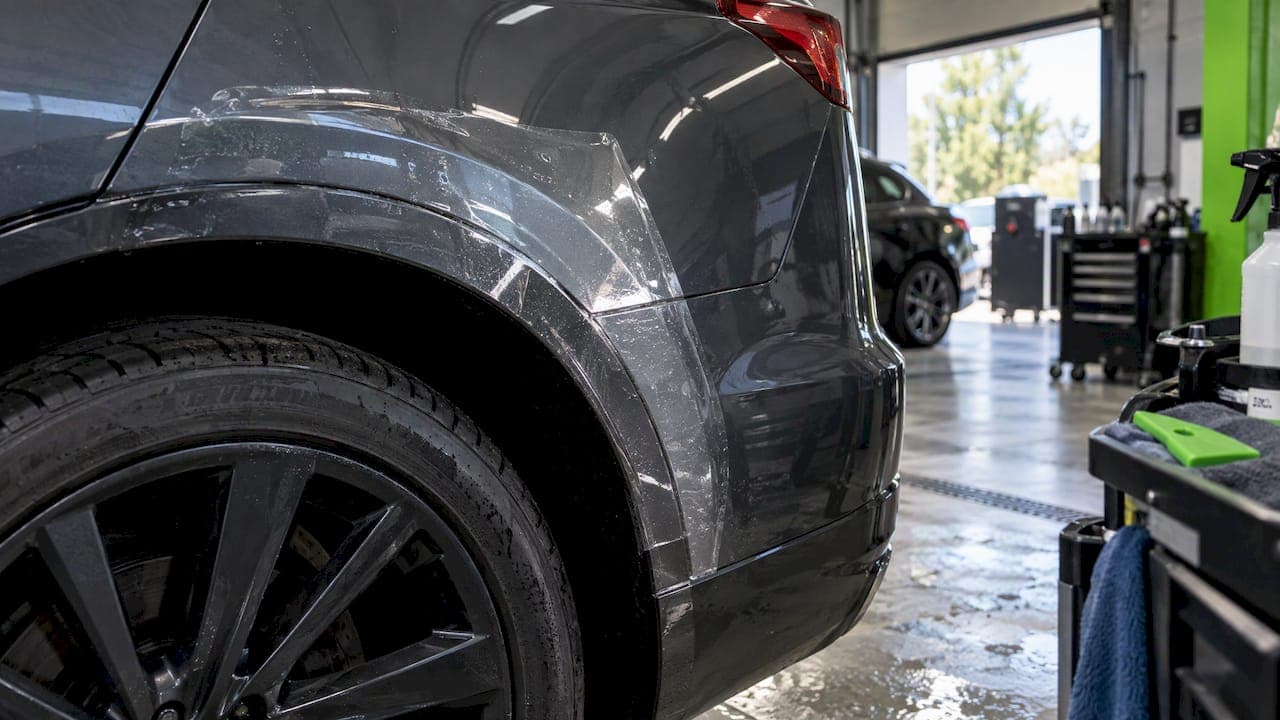
Rear wheel arch PPF is a clear urethane film applied to the painted lip and the area just behind each rear tire, where the tire throws gravel, sand, tar and road grime at your paint. It is one of the smaller jobs in paint protection, and one of the most useful. A good install is nearly invisible, resists chips and abrasion, and can be removed later without harming the factory finish. Below you will find what the film covers, how it goes on, what to ask an installer, and how to look after it.
TL;DR
- Rear arch film protects the paint edge and the panel behind the tire from stone chips, grit, tar and scuffs.
- Professional installers cut patterns by computer, so the film follows the arch curves and wraps the edge instead of leaving a visible seam.
- Thickness, self-healing topcoat and a manufacturer-backed warranty matter more than a low quote.
- Wait 48 hours before washing, and keep pressure washer nozzles away from the film edges.
- At Tint & Wraps Customs in Van Nuys, we install arch film on its own or as part of a Full Front or Full Body package.
Table of Contents
- Why the rear wheel arch takes such a beating
- What the film covers, and how precut kits fit
- Film thickness, self-healing and warranty: what to check
- How rear wheel arch PPF is installed
- Tesla and other EV owners: fit and sensors
- Perspective
- Aftercare: washing, maintenance and removal
- Is it worth doing the rear arches alone?
- Get rear arch film installed in Van Nuys
- FAQ
- Sources
Why the rear wheel arch takes such a beating
Look at what the rear tire does at speed. It picks up whatever is on the road and flings it backward and sideways. The panel directly behind and above the tire, plus the thin painted lip of the arch, takes the hits. Over time this shows up as a sandblasted, peppered look, small chips that rust-start at the edge, and a rough, dull strip right where the arch meets the body.
PPF is a thermoplastic urethane film applied to painted surfaces to guard against stone chips, bug splatter and minor abrasions, as a general overview of the film describes. The rear arch is a textbook place for it, because the damage here is constant, low-level and hard to touch up cleanly. Paint on an arch lip is also thin and sharp-edged, which is exactly where chips start.
Three driving habits make it worse:
- Highway miles. Higher speed means harder impacts from the same grit.
- Construction zones and unpaved shoulders. Loose gravel is the main culprit.
- Wide wheels and aggressive fitment. The closer the tire sits to the arch lip, the more it throws at it and the less room there is for error.
On many Valley commutes, with freeway stretches, patched asphalt and the occasional canyon road, the rear arches get a steady dose of all three.
What the film covers, and how precut kits fit
The term covers a few different jobs, and it helps to know which one you are asking for.
The arch lip and edge. A strip of film that wraps over the lip and tucks inside the arch. This is the minimum job, and the area that is hardest to protect later once chips have started.
The panel behind the tire. Often called the "front of the rear arch" area on sedans, or the rear quarter just ahead of the rear bumper on SUVs. This is where the stone impact marks usually appear first.
Door sill and rocker connection. On some vehicles the damage continues down the lower rear door and sill. Many owners extend the film there at the same visit.
Precut kits are patterns designed for a specific year, make and model. They are drawn from digital data of the body so the shape matches the arch contour. Film manufacturer 3M notes that professional installers use a library of thousands of computer-designed patterns to get custom-fit installs that conform to compound curves. That is the practical advantage over a roll of film cut by hand: the edges land where they should, and the cutouts line up with body lines, trim and moldings.
Two points about fit are worth knowing:
- A pattern is a starting point. Real cars vary by trim, wheel and aero package. A good installer trims and adjusts on the car, not just peels and sticks.
- Edges matter more than coverage. A smaller piece that wraps the lip cleanly will outlast a larger piece that stops short and lifts. We explain why in our guide on how to vet wrapped-edge PPF installs.
Film thickness, self-healing and warranty: what to check
When you compare quotes for arch film, these are the details that actually separate one job from another.
Thickness
Most paint protection film for full panels is sold in a range of thicknesses measured in mils (thousandths of an inch). A thicker film absorbs more impact, which suits an area under constant bombardment. For example, 3M's Scotchgard SGH12 is a 12 mil urethane film. Ask your installer what thickness and brand they plan to use on the arches, and why.
Self-healing topcoat
Light swirls and scratches from washing, brush marks and grit can disappear when the film's topcoat is warmed. Avery Dennison's 165-micron TPU film SPF-X2, for instance, has a self-healing topcoat that helps minor scratches disappear with heat. On an arch, where the film is constantly abraded, this keeps the finish clear for longer. For more on how it behaves, see our explainer on self-healing PPF.
Warranty
Warranty terms depend on the film and on who installs it. As one example, 3M states that SGH12 installed by a 3M Certified Installer carries a five-year warranty against yellowing, bubbling and cracking. Whatever film is used, get the warranty terms in writing, find out who backs them (the shop or the manufacturer) and ask what voids them. At Tint & Wraps Customs, our PPF work comes with manufacturer-backed warranties.
A quick comparison checklist
| What to ask | Why it matters |
|---|---|
| Film brand and thickness | Sets impact resistance and what the warranty covers |
| Self-healing topcoat | Keeps light scratches from building up |
| Edge treatment | Wrapped edges resist lifting and dirt creep |
| Pattern source | Computer-cut patterns fit the arch curves better |
| Install environment | Dust under the film shows as specks for years |
| Warranty in writing | Tells you who pays if it yellows, bubbles or lifts |
How rear wheel arch PPF is installed
This section is so you can judge a shop's process, not so you can do it yourself. The steps are consistent across film makers' published instructions, and a careful installer will follow them.
1. Decontaminate and clean
The paint has to be clean down to the pores. Avery Dennison's installation bulletin says proper preparation is critical for adhesion, including thorough cleaning to remove contaminants and, in some cases, an isopropyl alcohol solution to prep edges. Tesla's own service instructions for its film kit start the same way: wash the area with automotive soap and water, then dry it with a clean microfiber towel.
On arches, this includes the inner lip and the area behind it, where road tar and brake dust collect. A rushed prep here is the usual cause of early edge lift.

2. Position with a slip solution
The film is floated on a wet solution so it can be moved into place. Tesla's instructions describe a slip solution of about 85% water and 15% baby shampoo, with the film squeegeed afterward to push out air and moisture.
3. Squeegee, then wrap the edge
Moisture is worked out from the center to the edges. The overhang is then wrapped around the lip and tucked inside the arch so no raw edge faces the road spray. For curved areas, installers may stretch the film to conform, but Avery Dennison cautions that excessive stretching should be avoided because it can damage the film's structure. A pattern that fits well reduces how much stretching is needed in the first place.
4. Post-heat and inspection
Heat helps set the edges and locks in the wrap. We cover the details of this step in our post on wrapped-edge PPF installs.
Why the room matters
Dust, hair and fibers trapped under clear film look like tiny bumps, and they do not go away. This is why we do our installs in a climate-controlled, dust-free facility in Van Nuys. It is also why we caution against mobile or driveway installs for any film you expect to keep for years.
Tesla and other EV owners: fit and sensors
The rear arch on a Tesla is a straightforward place for film, but a few details deserve attention. Rear arch areas sit close to the body seams, the charge-port side panel and, depending on the model, trim pieces and sensors in the rear bumper region. Film should never cover or sit over a sensor, camera lens or radar area.
Here is what to check when you pick up the car:
- Edges stop short of seams and trim. The film should wrap or end cleanly, not overlap a gap.
- No film over sensor windows or camera openings. Compare the finished area against the panel layout on your own car.
- Inside the arch, the tuck is tight. Run a clean fingertip along it. It should be smooth, with no lifting.
- Features still work. Drive the car and confirm parking and driver-assist indicators behave as they did before.
Owners also ask whether some cars already come with film from the factory. Reports vary by model, build date and market, so check your vehicle's window sticker or ask the delivery center or service center before you pay for duplicate coverage. For Teslas especially, our approach is to fit the film to the factory panel layout so sensor areas stay clear. If you drive one, our post on protecting soft Tesla paint goes into what else is worth covering.
Perspective
We see the same thing on cars that come in with a clean hood and a rough rear arch. The owner protected the front, because that is where everyone looks, and ignored the area where the tire throws road debris all day. By the time the chips are visible, the film is covering damage instead of preventing it.
Our advice is simple. If you are already protecting the front end, add the rear arches in the same visit. It is a small area, the film is easy to keep clear, and the installation benefits from the same clean room and the same careful edge work as everything else on the car.
We also tell Tesla and EV owners to ask one question of any shop: how do you keep the film clear of sensors and seams? Ours is a fit-first process. We would rather trim a pattern on the car than force it to a shape it does not match.
Jake
Aftercare: washing, maintenance and removal
First two days
Avery Dennison's guidance is to wait 48 hours after installation before washing and to avoid high-pressure water near film edges. Small moisture pockets or a slight haze can appear in the first days as the film cures. Do not poke or press them. If they remain after a couple of weeks, bring the car back.
Everyday washing
- Use a gentle wash with a clean mitt, and rinse the arches too.
- Keep a pressure washer well away from edges. 3M notes that pressure near film edges is often discouraged, because high-pressure water can get underneath and weaken adhesion.
- Rinse off tar and bug residue early. It is easier to remove fresh.
We lay out a fuller routine in our PPF maintenance guide.
Removal
When the film has done its job, removal should not hurt the paint. 3M states that when professionally installed and removed, PPF does not damage factory paint. Avery Dennison's instructions say to pull the film back at a 0 to 45 degree angle to limit adhesive residue, with a heat gun or hair dryer if the film or the car is cold. Removal is a job for a shop, especially on repainted panels or older film, where the adhesive can behave differently.
Is it worth doing the rear arches alone?
For most owners the choice looks like this:
| Option | Best for | What you get |
|---|---|---|
| Rear arch film only | Daily drivers on a budget, newer cars with clean paint | Protection of the most exposed rear area |
| Arches plus Track Pack | Frequent highway or spirited driving | Coverage of the highest-impact zones |
| Full Front | Commuters who want front and arch protection | Bumper, hood, fenders, mirrors, and often the arch areas as a package |
| Full Body | Owners who want everything sealed | Every painted panel protected |
Coverage packages differ by vehicle, so ask for exactly which panels are included. We do not publish set prices for these services because the quote depends on the vehicle, the panels and the film, so we quote after seeing the car. To understand what PPF is protecting overall, read what PPF actually does. If you are weighing it against color change, see PPF vs vinyl wrap.
One more distinction: a do-it-yourself bumper or arch kit can be tempting, but a professional job with computer-cut patterns, wrapped edges and a warranty is a different product. Our post on pro PPF versus DIY rear bumper film walks through the differences.
Get rear arch film installed in Van Nuys
If you drive in the San Fernando Valley and want your rear arches covered before chips start, we can quote the job on its own or with a larger package. We install in a climate-controlled, dust-free facility, we work with Tesla and EV owners, and our installations come with manufacturer-backed warranties.
See our paint protection film services for the Track Pack, Full Front and Full Body options, then request a quote for your vehicle.
FAQ
Does rear wheel arch PPF work on any car?
Most vehicles can take it, as long as the paint is sound and the arch surface is accessible. Precut patterns exist for many popular models, and an installer can trim film to fit others. Paint that is already chipped or flaking should be assessed first, because film cannot fix failing paint.
Will the film turn yellow or peel?
Quality film is designed to resist yellowing, bubbling and cracking, and film makers back that with warranties, such as 3M's five-year warranty on SGH12 when installed by a certified installer. Peeling at the edges usually points to poor prep or a pressure washer aimed at the seam. A wrapped edge and a clean install room reduce that risk.
Can I get arch film on a Tesla without affecting sensors?
Yes, when the film is fitted to the factory panel layout and kept off sensor windows, camera openings and seams. We fit Tesla and EV installs with that in mind, and you should confirm the same with any shop. After the job, drive the car and check that driver-assist and parking features behave as before.
Can I wash the car right after installation?
Not yet. The film maker's guidance is to wait 48 hours before washing. After that, use gentle washing and keep pressure washer nozzles away from the edges.
Sources
- Paint protection film overview
- 3M Scotchgard Paint Protection Film SGH12
- Avery Dennison IB4.30 Paint Protection Film Application
- Tesla Service: Installing Paint Protection Film Kit