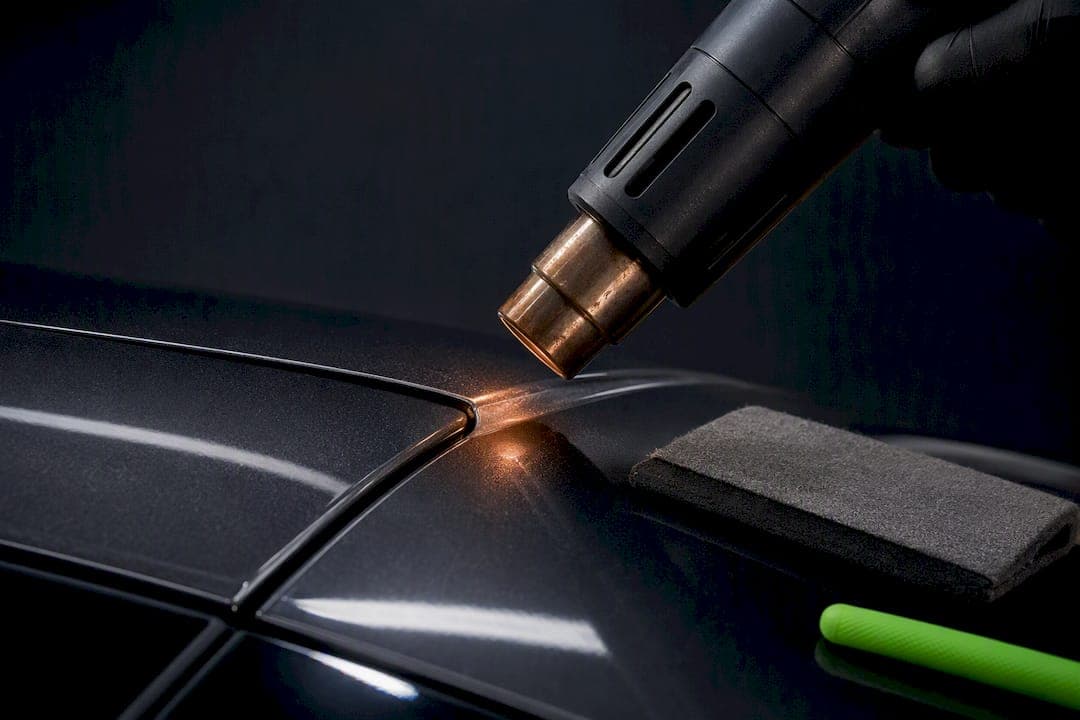
Wrapped edges are worth it on almost every visible, front-facing panel. Wrapping (extending film past the panel edge and tucking it onto the backside) hides the cut line, sheds dirt better, and lasts longer than a butted edge. Skip it on panels with tight geometry, trim you'd rather not remove, or a budget that doesn't stretch to the extra labor. The sections below cover installation technique and upkeep so you know what a proper job looks like.
TL;DR:
- Wrapping edges is most beneficial on front-facing panels like hoods and bumpers due to their exposure to debris, dirt, and visible seams under sunlight.
- Proper surface prep with isopropyl alcohol and post-heat treatment between 203°F and 221°F are critical to ensure long-lasting adhesion and prevent edge lifting.
- Wrapping takes extra time because of careful edge shaping, relief cuts, and trimming, and involves potential trim removal; not all panels or geometries are suitable for wrapping.
- Installation in climate-controlled facilities by experienced professionals and factory-backed warranties ensures durability and reduces risks of dirt trapping or damage.
- Regular early inspections, gentle washing, and avoiding hydrophobic waxes help maintain wrapped edges and catch problems before costly repairs are needed.
Table of Contents
- What Makes Wrapped-Edge Paint Protection Film Worth the Extra Labor?
- How Do Professionals Wrap and Tuck PPF Edges?
- How Do You Stop Wrapped PPF Edges From Lifting?
- Why Shop Conditions and Warranties Matter for Wrapped Edges
- A Practical Way to Decide on Wrapped Edges
- Getting a Wrapped-Edge PPF Install Done Right in Van Nuys
- Where to Verify Installation Specs
- Sources
- FAQ
What Makes Wrapped-Edge Paint Protection Film Worth the Extra Labor?
A wrapped edge means the installer takes the paint protection film past the visible edge of a panel and tucks it into a seam, gap, or the underside where you can't see it. A standard butted edge just stops on the flat surface, leaving a raised line that catches light, dirt, and eventually the edge of a fingernail.
Appearance is the first thing most owners notice. On dark or metallic paint, an unwrapped film edge shows up as a faint silver seam under direct sun, especially on hood leading edges and mirror caps. Wrapping the film into a body seam or under a lip removes that line entirely. On a black Tesla Model 3 or a dark gray truck, that difference is the line between "this car has PPF" and "this car looks stock."
Durability is the second, and arguably bigger, reason. An exposed cut edge is where dirt, road salt, and wash water collect first. Every time water hits that line, some of it wicks under the film by capillary action, which is exactly what starts edge lifting months later. A wrapped or properly tucked edge has nowhere for water to sit against the adhesive line, and wrapping the edge into a seam reduces the dirt and wax buildup that accumulates along a visible cut line. It's a simple mechanical advantage: no exposed edge, no wicking point.
None of that comes free. Wrapping takes more time on the table and more time on the car, since the installer has to work the film around a curve instead of just butting it against a flat surface. Some panels require pulling trim, emblems, or plastic clips to tuck the film properly, which adds labor and, on certain vehicles, risk of breaking a clip that's already brittle from age or sun exposure. And on some panel geometries, wrapping the edge actually increases stress on the film rather than reducing it, which is why a shop should never wrap on autopilot.
Priority panels where wrapping earns its keep, roughly in order:
- Hood leading edge: the highest-impact zone for rock chips and the most visible seam line if left unwrapped.
- Front bumper corners: constant curb and debris exposure, and the corner radius hides the wrap seam well.
- Fender edges near the wheel arch: heavy grime exposure makes an unwrapped edge collect dirt fast.
- Mirror caps: small parts, but the seam is eye level and impossible to miss if it's unwrapped.
- Rocker panels and lower door edges: high splash exposure, though access here often means removing trim.
How Do Professionals Wrap and Tuck PPF Edges?
Every wrapped edge starts before the film ever touches the car. Surface prep decides whether the wrap holds for years or lifts within a season, and pattern planning decides whether the film piece was even designed to wrap in the first place.
1. Clean the surface with isopropyl alcohol. Any wax, sealant, or oily residue left on the panel edge stops the adhesive from bonding fully. A film that's wrapped over a waxed surface looks fine on install day and starts peeling at the corners within weeks, because the bond never had a real chance to grab.
2. Extend the pattern before it's plotted. Modern pattern software includes a dedicated workflow for this. XPEL's DAP software, for example, has a Wrap Edges tool that lets installers mark and extend specific panel edges so the plotted piece already has enough material to wrap and tuck, instead of the installer trying to stretch a standard-cut piece further than it was designed to go. This shifts the wrap decision to the planning stage, not the install table.
3. Lay the film flat with minimal stretch. Overstretching a wrapped edge is the single most common rookie mistake. Stretched film wants to relax back toward its original shape, and at a wrapped edge that relaxation pulls the corner away from the panel. Arlon's installation documentation is explicit on this point, calling for minimal stretch on cut edges rather than the more aggressive stretch some installers use mid-panel.
4. Make relief cuts where the geometry demands it. Tight curves, especially around mirror caps and complex bumper corners, need small relief cuts so the film can wrap without bunching or tunneling. A good installer maps these tuck points before applying the film at all, measuring panel gaps and planning relief cuts in advance rather than improvising them mid-install.
5. Let the film relax before trimming. Trim too early and the film shifts slightly as it settles, leaving a ragged edge. A short relax period, roughly the time it takes to move to the next panel and come back, gives the film a chance to settle into its final position.
6. Post-heat the edges and seams. This is the step that actually locks the wrap in place long-term. Arlon recommends heating wrapped edges and seams to between 203°F and 221°F (95°C to 105°C) to set the adhesive and relieve the film's memory, the tendency of stretched film to try to pull back toward its original shape. Skip this step and the wrap looks perfect on delivery day but starts lifting at the corners within a few months.
Pro Tip: Ask your installer directly what temperature range they post-heat wrapped edges to. A shop that gives you a specific number, not a vague "we heat it good," is telling you they follow a documented process rather than guessing.

Tools that separate a clean wrap from a sloppy one: a felt squeegee that won't scratch the film, bone cards or erasers for burnishing tight corners, knifeless tape for trim lines that need to stay perfectly straight through a curve, and a heat gun with real temperature control rather than a single high setting. Never cut film while it's still hot from the heat gun; it shrinks slightly as it cools, and a cut line made hot will end up short once it settles. And never force a wrap around trim or emblems that clearly need to come off first. Forcing it stresses the adhesive at exactly the spot you're trying to protect.
How Do You Stop Wrapped PPF Edges From Lifting?
Edge lifting has a short list of real causes, and almost all of them trace back to the install rather than anything the owner did afterward. Trapped moisture under the film during application, insufficient surface prep, film stretched too aggressively at the corner, and a skipped or rushed post-heat step account for the vast majority of lifted edges that shops see months after installation.
That means most maintenance is really about not undoing good work, rather than actively preventing a defect that a solid install wouldn't have anyway.
- Wash gently and keep pressure washers away from edges. A direct blast of high-pressure water aimed at a wrapped seam can force water under a corner that's still settling in its first weeks, and even on a mature install it's unnecessary risk for no benefit.
- Skip hydrophobic polymer waxes on wrapped sections. 3M's installation guidance specifically warns against applying hydrophobic polymer wax on wrapped edges, since certain formulations can interfere with the film's edge bond over time.
- Remove wax buildup with a dedicated film-safe cleaner rather than scrubbing at a seam with an abrasive pad.
- Reach for edge sealant only where the tuck genuinely can't happen, like a cut line that has to terminate on a flat visible surface with nowhere to hide. A properly tucked or wrapped edge usually doesn't need it at all.
A simple inspection routine catches problems early, before they turn into a full re-tuck. At one week, run a finger lightly along the main wrapped edges to feel for any corner that feels loose or slightly raised. At one month, check the same spots after the film has been through at least one full wash cycle. Annually, look closely at high-exposure zones like the front bumper corners and hood leading edge for any sign of dirt collecting along a seam, which usually means the tuck has opened slightly. Catching a lifted corner early is a five-minute fix; catching it six months late often means replacing the whole panel section. For a deeper look at warning signs, see this breakdown of PPF edge lifting causes and fixes, and general upkeep guidance is covered in this PPF maintenance guide.
Why Shop Conditions and Warranties Matter for Wrapped Edges
A wrapped edge is only as good as the environment it was installed in. Dust that settles under film mid-install creates a bump that shows up right at the wrap seam, which is why Tintandwrapscustoms installs every job in a climate-controlled facility rather than an open bay. Fewer airborne particles means fewer tiny defects exactly where a wrapped edge needs a clean bond.
Tesla and other EV panels bring their own wrinkles: sensor housings, flush door handles, and frunk seams that all demand careful trim removal without triggering a fault code. Tintandwrapscustoms' EV-specific experience matters here, since a wrapped edge done wrong around a sensor can mean a costly recalibration.
Before you book anywhere, ask three questions: what temperature range they post-heat wrapped edges to, whether the warranty is manufacturer-backed or shop-only, and what they inspect before handing the car back. Tintandwrapscustoms backs its installs with manufacturer warranties, a 5-star reputation, and more than 1,000 vehicles protected, the kind of track record that comes from doing wraps correctly at volume.

A Practical Way to Decide on Wrapped Edges
If you're keeping a premium car long-term, wrap everything feasible. The labor cost amortizes over years of ownership, and unwrapped edges are the first thing that ages visibly. If it's a daily driver you'll trade in a couple of years, prioritize just the hood and bumper corners. Complex panels with fragile trim clips? Ask the shop to show you exactly which pieces need removal and get it in writing on the work order before they start.
— Jake
Getting a Wrapped-Edge PPF Install Done Right in Van Nuys
Choose a shop experienced in wrapped edges done according to manufacturer documentation, not rushed installs that shortcut them. Professional installs are typically done in climate-controlled facilities to provide dust-free conditions needed for clean wrap seams. Experienced teams have knowledge of Tesla and EV sensor housings and trim work that can complicate installs, and some offer manufacturer-backed warranty coverage.
Before booking, decide which panels matter most to you: full front, full body, or something in between, like The Track Pack. We'll walk you through post-heat specs, which trim pieces need to come off for a proper tuck, and what the inspection looks like before your car leaves the bay. Request a quote through our paint protection film page and get a straight answer on what wrapping will cost for your specific vehicle.
Where to Verify Installation Specs
For the technical details behind everything above, go straight to the source. 3M and Arlon both publish installation guidelines with exact post-heat and care specs, XPEL's DAP knowledge base covers pattern-extension workflow, and EuroLuxe Detailing's breakdown of edge sealing is worth reading for the tuck-point mapping process in more depth. Pattern-planning tools like the ones used in custom-fit manufacturing workflows follow a similar pre-plot logic worth understanding.
Sources
- 3M Paint Protection Film installation guideline
- Arlon IllumiNITE wrap installation guide
- PPF edge sealing and tucking: what separates good from great installation | EuroLuxe Detailing
- PPF edge wrapping benefits explained - Point Auto
FAQ
Should PPF Be Wrapped Around Edges?
On most visible, front-facing panels, yes. Wrapping hides the cut line and reduces dirt and wax buildup along the seam, though panel geometry and trim-removal cost mean it isn't automatic on every surface.
How Do You Get PPF Edges to Stick Properly?
Clean the panel thoroughly with isopropyl alcohol to remove wax and oil before applying film, since residue is the top cause of edge failure. Post-heating the edge to 203°F to 221°F afterward sets the adhesive and prevents the corner from pulling loose.
What Is the Disadvantage of a PPF Wrap?
Wrapping adds labor time and sometimes requires removing trim, clips, or emblems, which raises cost and, on brittle or aging parts, some risk of breakage. On certain tight panel curves, wrapping can also add more stress to the film than a standard butted edge would.
Can You Wrap Over Existing PPF?
Applying new film directly over old PPF isn't standard practice, since the old film's edge and any degradation underneath compromise the new layer's bond. The old film should come off and the panel should be cleaned before a fresh wrapped-edge install goes on.
Does Every Panel Need Wrapped Edges?
No. High-exposure zones like the hood leading edge, bumper corners, and mirror caps benefit the most, while flatter, lower-visibility panels sometimes do fine with a standard edge. A shop like Tintandwrapscustoms can walk you through a panel-by-panel plan during a vehicle evaluation.