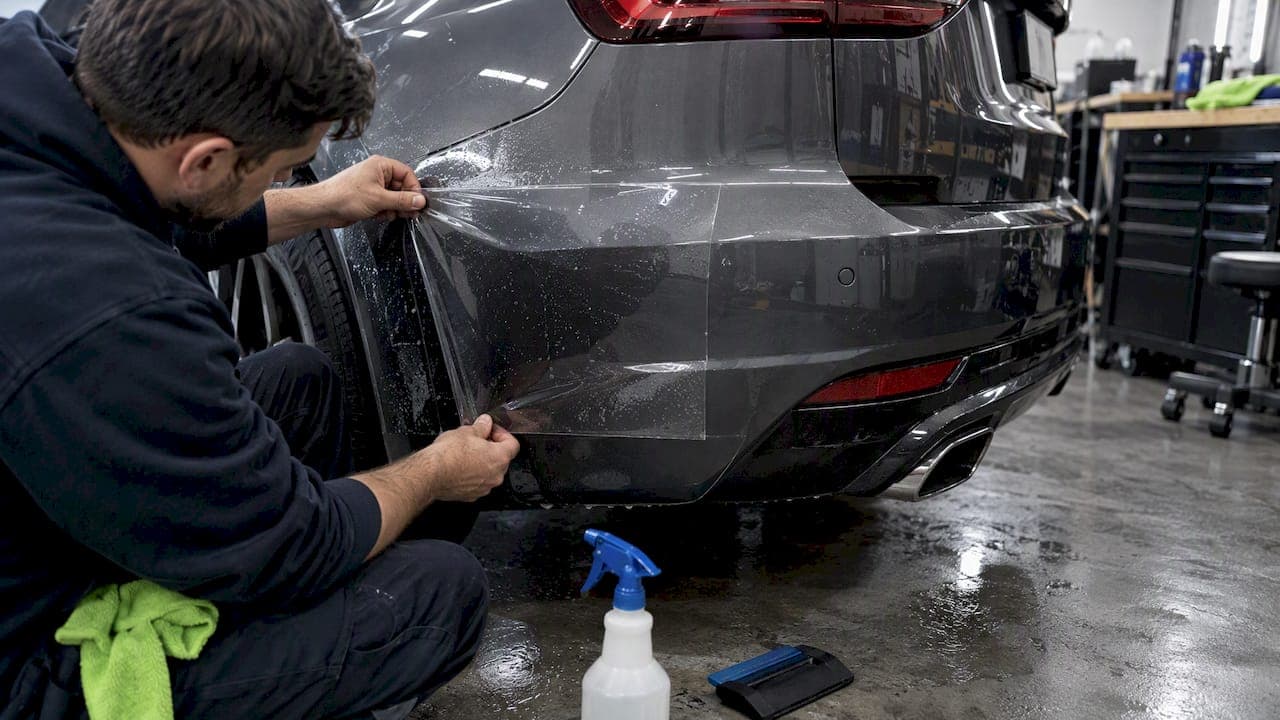
A rear bumper protector film is worth installing for most drivers who park in tight spots or load cargo often, and the right approach depends on how long you want the protection to last. A DIY universal kit handles light scuffs on a budget, while professional PPF or a pre-cut appliqué gives you durable, paint-safe coverage with a warranty. For most owners, a quick self-check of budget and skill level points to the right choice fast.
TL;DR:
- Universal DIY TPU bumper kits are affordable and easy to install on flat, painted surfaces but struggle with tight curves and textured plastics.
- Pre-cut appliqués offer a better fit for specific models, reducing trimming needs, but come at a higher price than universal rolls.
- Professional PPF provides the longest-lasting, best-looking protection with warranties, especially on complex bumpers with sensors or contours.
- Most TPU films are 6.5 to 8.5 mil thick, with self-healing topcoats that smooth light surface scratches when heated, but do not fix deep damage.
- Proper installation in climate-controlled environments, with attention to surface type and edge sealing, vastly improves long-term durability and appearance.
Table of Contents
- DIY film kits vs. professional PPF: which fits your bumper
- What the film is made of and what specs actually matter
- Fit and compatibility: painted surfaces, textured plastic, and pre-cut vs universal kits
- Installation realities: DIY wet-install steps and what pros do differently
- Cost, lifespan, and realistic expectations
- Maintenance, removal, and long-term care
- How to choose a rear bumper film or installer: checklist and red flags
- Why professional installation matters for lasting protection
- What actually matters when you're choosing bumper protection
- How we help if you're ready for professional bumper protection
- FAQ
- Sources
DIY film kits vs. professional PPF: which fits your bumper
A universal DIY kit usually ships as a roll of clear TPU film with a squeegee and spray bottle, meant for flat or gently curved painted panels. These kits work for drivers who back into tight driveways or load bikes and want basic scratch resistance without paying installer fees. Marketplace listings for universal TPU rear bumper kits advertise self-healing topcoats and wet-apply installation, but they note the film performs best on smooth painted surfaces rather than textured plastic.
Professional PPF or a pre-cut appliqué takes a different path. A shop or a model-specific kit uses a template cut to your bumper's exact contours, which removes most of the trimming guesswork and reduces the odds of lifted edges. Pre-cut rear bumper PPF for specific models is often sold with multi-year durability claims and a tighter fit than a universal roll, since the pattern already accounts for body lines, sensors, and trim gaps.
Here's how the two routes stack up in practice:
- DIY kits: lower upfront cost, faster to buy, but limited to simple shapes and often skip tight curves around exhaust cutouts or diffusers.
- Pre-cut appliqués: better fit for specific models, less trimming, but priced higher than a generic roll.
- Professional PPF: best long-term durability and finish quality, backed by shop warranties, at the highest price point.
- Visible foam or rubber guards: a different category entirely, built for impact absorption rather than an invisible finish.
If you drive a daily commuter and mostly worry about curb scuffs, a DIY kit on the lower bumper edge might be all you need. If you own a newer vehicle with sensors, parking assist cameras, or a finish you want to keep showroom-level for resale, professional installation is the safer bet.
What the film is made of and what specs actually matter
Most clear bumper protection sold today is thermoplastic polyurethane (TPU), not vinyl. TPU stretches around curves without creasing and resists yellowing better than older vinyl films, which is why it dominates both DIY kits and professional PPF.
Thickness is measured in mils, and it shapes how the film behaves. A thinner film, around 6 to 7 mils, conforms more easily to compound curves but offers less impact resistance. A thicker film in the 8 to 8.5 mil range, common in consumer TPU kits, adds protection against rock chips and key scrapes but requires more heat and patience to stretch around tight corners.
Self-healing topcoats are common on both DIY kits and premium PPF, and they use heat, usually sunlight or a heat gun, to smooth out light swirl marks and fine scratches rather than deep gouges. Consumer TPU bumper protectors market this feature alongside wet-apply installation, while model-specific kits like the pre-cut Mustang rear bumper film list a 6.5 mil polyurethane film with a self-healing topcoat rated for up to 10 years of outdoor durability on that application.
A few specs worth checking before you buy:
- Film type: TPU over vinyl for stretch and clarity.
- Thickness: thicker films resist impact better but need more install skill.
- Topcoat: self-healing only fixes light surface marks, not deep scratches or cracks.
- Adhesive and clarity: cheap adhesive yellows faster and can leave residue on removal.
Optical clarity matters more than most buyers expect. A film with a slight haze or orange-peel texture out of the box rarely improves with time, so check reviews and sample photos before committing to a brand.
Fit and compatibility: painted surfaces, textured plastic, and pre-cut vs universal kits
Film adheres best to smooth, painted surfaces, whether that's painted metal or the painted plastic sections of a bumper cover. Grainy or unpainted plastic, like the lower valances common on trucks and SUVs, often rejects film adhesive or allows it to lift at the edges within months.

Pre-cut appliqués solve a lot of the fitment guesswork. Because the pattern is built for a specific model and year, you get clean edges around marker lights, exhaust cutouts, and body creases without freehand trimming. Universal rolls demand more skill: you're cutting around curves by eye, which raises the risk of visible seams or film that curls at the corners within the first few weeks.
Temperature matters during installation too. Manufacturer guidance for bumper protection products generally recommends installing around 72°F, since adhesive bonds poorly in cold conditions and can lead to early lifting or a failed warranty claim.
Before buying, confirm fitment with these checks:
- Surface type: run your hand over the bumper to feel for texture versus smooth paint.
- Model-specific kit availability: search by year, make, and trim before defaulting to a universal roll.
- Edge sealing plan: know whether the kit includes edge sealant or relies on film alone.
- Sensor and camera cutouts: verify the pattern accounts for parking sensors if your bumper has them.
Installation realities: DIY wet-install steps and what pros do differently
A wet install is the standard DIY method for TPU bumper film, and it buys you time to reposition the film before the adhesive sets. Here's the general sequence:
- Wash and clay the bumper to remove wax, dirt, and residue that would trap air under the film.
- Mix a soapy water solution and spray it generously on both the bumper and the adhesive side of the film.
- Lay the film in place and use a squeegee to push out water and air from the center outward.
- Trim excess film along edges and seams with a sharp blade, leaving a small margin for wrap-around.
- Apply heat with a heat gun to shrink the film around curves and seal the edges.
- Let the film cure for 24 to 48 hours before washing or exposing it to heavy moisture.
DIY kits typically include the film, a squeegee, and a spray bottle. Professional shops use a plotter to cut film to exact digital patterns, infrared heat lamps for faster and more even curing, and edge sealants that resist lifting far longer than a hand-trimmed edge.
Pro Tip: If you're installing yourself, work in a shaded, dust-free area and keep a second person on hand to help stretch film around tight corners.
The most common DIY mistakes are trapped air bubbles, uneven trimming at panel gaps, and rushing the heat-shrink step, which leaves visible stress lines. A shop environment solves these problems through climate control, dust-free bays, and installers who pattern-cut daily. When removal time comes, a professional also knows how to lift film without pulling clear coat with it, something that's easy to get wrong with a blade and impatience.
Cost, lifespan, and realistic expectations
A DIY universal kit is the cheapest entry point, while pre-cut appliqués and full professional PPF installation cost more upfront but tend to last longer and look cleaner.
Self-healing topcoats on premium PPF are designed to maintain clarity and resist yellowing for years longer than basic consumer film, with model-specific pre-cut kits rated for up to 10 years of outdoor durability on the application they're built for.
Lifespan depends heavily on conditions. Sun exposure breaks down lower-grade adhesives faster, road salt accelerates edge lift in winter climates, and abrasive automatic car washes introduce fine swirl marks that a basic topcoat may not fully heal. Edge lift, once it starts, tends to spread unless it's trimmed or resealed early.
A few cost factors worth weighing before you buy:
- Film grade: thicker, branded film costs more but resists impact and yellowing longer.
- Installation method: pre-cut and professional install reduce redo costs from a botched DIY attempt.
- Warranty coverage: a manufacturer-backed warranty can offset the cost of a future repair or replacement.
- Climate: humid, salty, or high-UV regions shorten film lifespan regardless of brand.
Factoring in warranty coverage changes the real cost comparison. A cheaper DIY kit that needs replacing in a year or two can end up costing more over time than a single professional install backed by a multi-year guarantee.
Maintenance, removal, and long-term care
Keeping bumper film clear starts with gentle washing: hand wash with a pH-balanced soap rather than running the car through an automatic brush wash, which can introduce fine scratches over time. A regular maintenance routine that avoids abrasive pads and harsh solvents keeps the topcoat working as intended.
Light surface scratches often respond to heat. Parking in direct sun or using a heat gun on the lowest safe setting can trigger the self-healing topcoat to smooth minor marks within minutes. Deeper scratches or cuts through the film won't heal and usually call for a patch or full panel replacement.
When it's time to remove film, patience matters more than tools. Gentle heat loosens the adhesive, and pulling slowly at a low angle reduces the risk of lifting clear coat underneath. If the film has been on for several years or the adhesive has yellowed and hardened, professional removal is the safer route to avoid paint damage.
A few habits that extend film life:
- Hand wash only: skip automatic brush washes that introduce swirl marks.
- Avoid wax on fresh film: let new installs cure fully before applying any coating.
- Pair with ceramic coating: a ceramic topcoat over PPF adds slickness and makes dirt easier to rinse off.
- Inspect edges seasonally: catching early lift lets you reseal before moisture gets underneath.
How to choose a rear bumper film or installer: checklist and red flags
Before you buy a kit or book a shop, run through a short checklist to avoid a mismatched product or a rushed install.
- Confirm film type and thickness: TPU in the 6.5 to 8.5 mil range is the common sweet spot for protection and conformability.
- Check for a self-healing topcoat: useful for daily scuffs, not a substitute for impact protection.
- Ask about fitment: pre-cut for your exact model reduces trimming and edge lift risk.
- Look for warranty language: a manufacturer-backed warranty signals confidence in the product's durability.
When talking to a shop, ask directly about their facility conditions, whether they've installed PPF on your specific make, and how they handle sensor and camera cutouts if your bumper has them. A shop that can't answer fitment questions clearly, or pushes a generic roll without a pattern plan, is a red flag worth walking away from.
Pro Tip: Ask to see a photo of a completed install on the same model before you book, especially around curved sections like diffusers or exhaust tips.
DIY makes sense if you're protecting a daily driver against minor scuffs and you're comfortable with a blade and a heat gun. Professional installation is the right call when you want a resale-ready finish, you're protecting a newer vehicle with sensors, or you simply don't want to risk a bad trim line on a car you plan to keep for years.
Why professional installation matters for lasting protection
Booking a shop instead of going the DIY route comes down to risk reduction. A climate-controlled, dust-free installation bay keeps debris out from under the film during application, which directly affects how clean and bubble-free the final finish looks. We install paint protection film in exactly that kind of environment, and the same setup supports our work on Tesla and other EV models, where sensor placement and panel gaps require extra care to avoid interference.
Some professional services offer manufacturer-backed warranties that cover issues like film lifting or yellowing under normal conditions. Many vehicles have been protected with professional PPF installs backed by a reputation for attention to detail.
If you're weighing DIY against a shop, the clearest signal is your vehicle's complexity. A simple sedan with a flat rear bumper may be suitable for DIYers, while vehicles with sensors and tight panel gaps will benefit more from professional fitment and warranty backing.
What actually matters when you're choosing bumper protection
The conventional advice treats this as a simple binary: cheap DIY film for budget buyers and expensive PPF for people who care. That framing misses the real variable, which is how much your bumper's shape and your climate punish a bad install. A flat panel in a mild climate forgives sloppy trimming. A curved bumper with sensor cutouts in a salty, high-UV region does not, and that's where a rushed DIY job turns into a year-two regret.
What's overrated is the self-healing topcoat as a selling point on its own. It's a nice feature for light swirl marks, but it says nothing about how well the film was cut, sealed, or stretched around your specific bumper, and a mediocre install with a self-healing topcoat still lifts at the edges just as fast as one without it.
Prioritize fit and installation quality over brand claims on the packaging. A well-installed mid-grade film beats a premium film installed with air bubbles and a curling edge every time.
— Jake
How we help if you're ready for professional bumper protection
For those deciding against a DIY kit due to bumper shape or vehicle sensors, professional paint protection film installation is available in a climate-controlled facility designed to reduce dust and debris. Coverage options include full front, full body, and targeted high-impact zone protection.
What to expect when you book with us:
- An estimate based on your model and coverage choice, whether that's a rear bumper section or a full front package.
- A scheduled appointment in our Van Nuys facility, with turnaround time discussed upfront.
- Manufacturer-backed warranty coverage on the completed install.
Check out our paint protection film page to see coverage options and get your estimate started.
FAQ
What is the best rear bumper protector?
The best option depends on your bumper's shape and how long you want protection to last. A pre-cut appliqué or professional PPF install generally outperforms a universal DIY kit on fit and durability, especially on bumpers with curves, sensors, or textured panels.
Is protective film on a car worth it?
Yes, for most drivers who want to guard against rock chips, curb scuffs, and fine scratches without altering the car's appearance. A quality TPU film with a self-healing topcoat preserves resale value and keeps the factory finish looking clean longer than going without protection.
Are bumper protectors worth it?
Clear film protectors are worth it if you prioritize an invisible finish and long-term paint protection, while visible foam or rubber guards suit drivers in dense parking environments who want impact absorption over looks. Both categories solve different problems, so the right choice depends on your parking situation and finish preference.
What is the downside of PPF?
PPF costs more upfront than basic DIY film, and a poor installation can trap air bubbles, lift at the edges, or require professional removal to avoid damaging the paint underneath. Choosing a shop with a dust-free facility and documented fitment experience reduces these risks significantly.
Sources
- SEC10 Mustang Rear Bumper Paint Protection Film 485019 (15-23 Mustang GT, EcoBoost, V6) - Free Shipping
- Car Rear Bumper Protector 8.5 Mil Clear PPF Film for Car Paint Protection, Universal Door Entry Edge Guard & Scuff Plate Protector
- FlexyGuard Large 23" — Bumptek