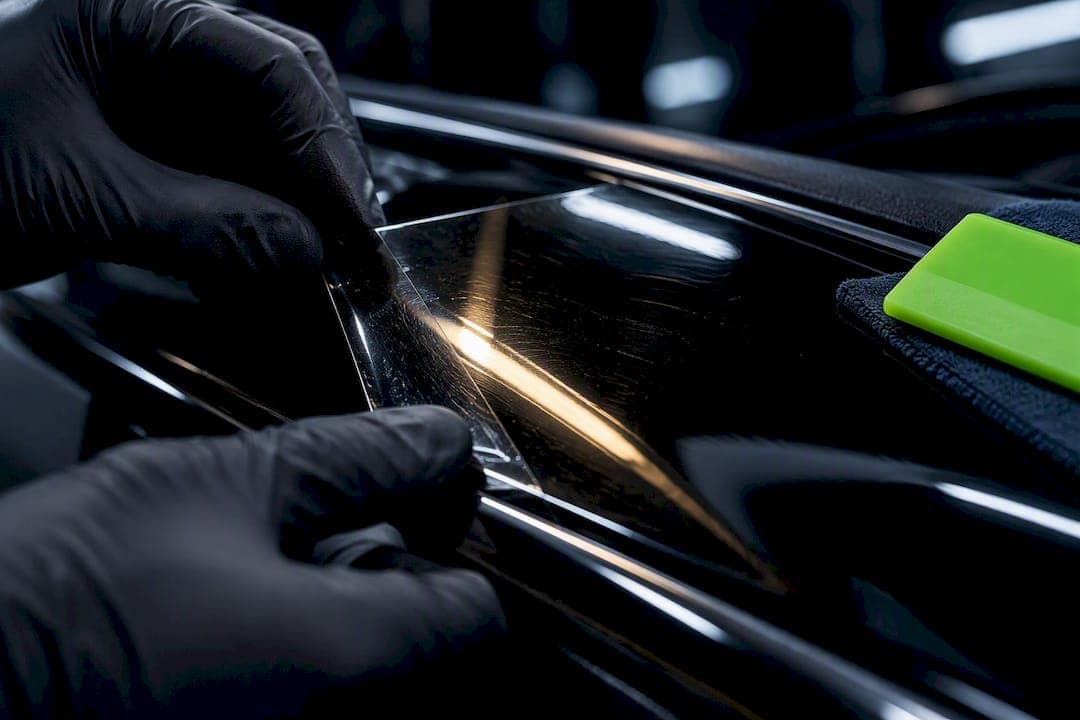
Yes. Interior paint protection film reliably stops the micro-scratches that plague piano black trim and touchscreens, but only when the surface is prepped correctly and the film is installed by someone who knows what they're doing. If the panel already has deep gouges or the plastic is textured instead of true gloss, PPF won't fix that, and it isn't magic on a bad substrate. On a properly corrected surface, though, it's the closest thing to a permanent fix this material has ever gotten.
TL;DR:
- Proper surface preparation and professional installation are crucial for interior paint protection film to effectively prevent scratches on piano black trim.
- Interior PPF typically lasts five to seven years indoors, offering a durable shield against daily contact and contact-related damage.
- Not all glossy panels suit PPF; textured plastics or panels with deep gouges cannot be effectively protected or concealed with film.
- DIY installation may work on flat, simple surfaces but requires experience with heat-forming and precise trimming, especially on complex curves or screens.
- Regular maintenance includes gentle cleaning and cautious use of heat to promote self-healing, with signs of lifting or haze indicating potential replacement needs.
Table of Contents
- The Piano Black Problem: Why Gloss Interiors Show Scratches
- What Interior PPF Is and How Self-Healing Urethane Works
- Which Piano Black Surfaces Can You Protect?
- Installation: What to Expect From Pros and DIYers
- Preparation and Limitations: What Polishing Can and Can't Fix
- Cost, Packages, and How Long the Film Lasts
- Maintenance: Cleaning, Self-Heal, and Warning Signs
- How a Reputable Shop Evaluates and Guarantees the Work
- Compatibility Risks: Adhesion, Yellowing, and Texture Mismatch
- PPF vs. Clear Coat Sprays and Vinyl Wraps for Piano Black Trim
- Spotting Real Piano Black Trim vs. Synthetic Look-Alikes
- When PPF Fails: Signs, Repairs, and Replacement
- When Interior PPF Is Worth the Investment
- Get Your Piano Black Trim Protected the Right Way
- Sources
- FAQ
The Piano Black Problem: Why Gloss Interiors Show Scratches
Piano black trim looks like polished stone, but it behaves more like a fingernail file waiting to happen. It's a soft, high-gloss plastic, usually acrylic or polycarbonate, with no automotive clear coat sitting on top of it the way your car's exterior paint has. That clear coat is what absorbs abuse on the outside of the car. Piano black interior panels get none of that protection, just bare gloss plastic exposed directly to everything you touch it with.
That's why the damage shows up so fast, and why it looks so much worse than it is. A scratch that would be invisible on a textured dash becomes a spiderweb under any angled light source, dome light, sunlight through the windshield, phone flashlight, it doesn't matter.
Daily contact points that cause the damage include:
- Fingernails and rings brushing across the console or shifter surround
- Keys, coins, or phone cases set down on the trim
- Shirt buttons and jacket zippers during entry and exit
- Microfiber towels loaded with trapped grit from a "quick wipe down"
- Kids' toys, backpack buckles, and pet claws in family vehicles
Owner threads on forums back this up consistently. New piano black trim can pick up visible swirl patterns within the first few weeks of ownership, long before any other interior surface shows wear.
What Interior PPF Is and How Self-Healing Urethane Works
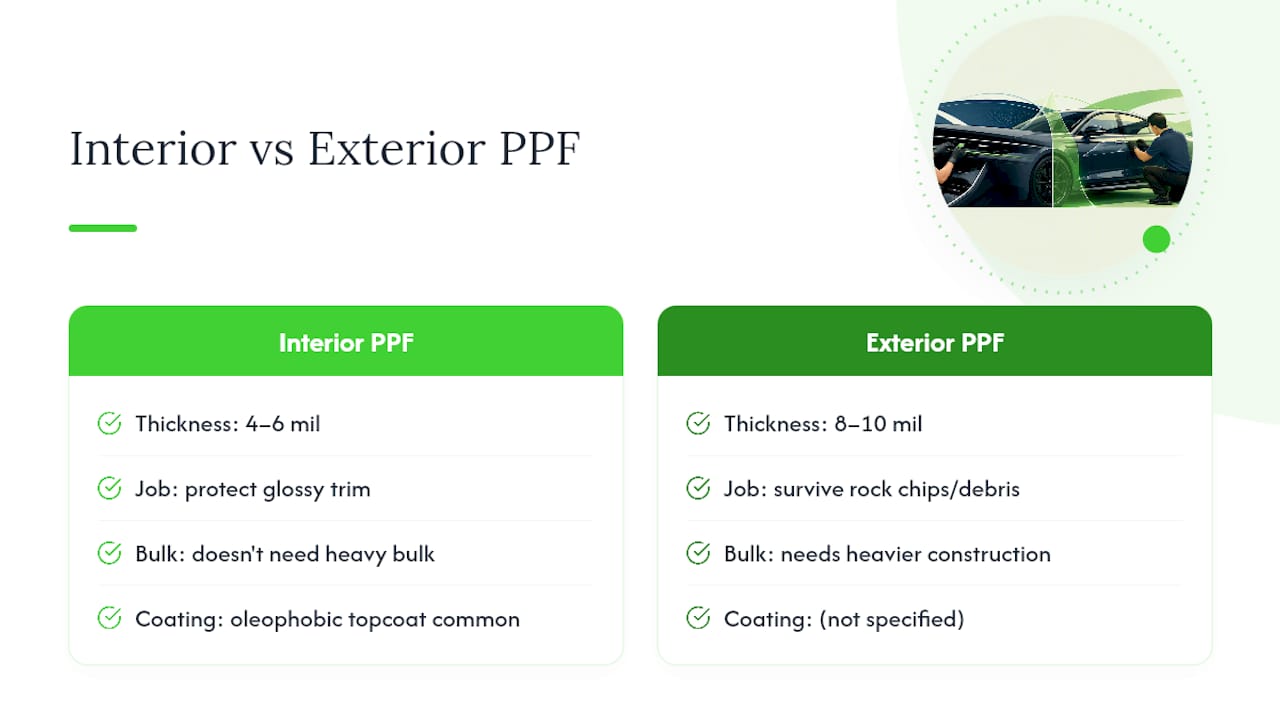
Interior PPF is a thin urethane film, typically running 4 to 6 mil, applied directly over glossy trim to create a sacrificial layer between your daily habits and the actual plastic underneath. Compare that to exterior PPF, which usually runs 8 to 10 mil because it has to survive rock chips and road debris at highway speed. Interior film doesn't need that bulk. It's built for a different job: resisting fingerprints, staying optically clear on a screen, and flexing around tight curves without lifting.
Most interior films also carry an oleophobic topcoat, the same category of coating used on phone screens, which cuts down on smudges and makes wiping down the console genuinely easier than wiping bare piano black plastic.
The self-healing part is where people usually raise an eyebrow, and it's worth explaining plainly: the urethane's polymer structure flows slightly when warmed. A light swirl mark is really just a disruption in that polymer surface, and mild heat, whether from sunlight through the windshield, a warm microfiber cloth, or a heat gun on a low setting, lets the film relax back into a smooth layer. It's not repairing a scratch in the plastic underneath. It's healing the film sitting on top of it.
Interior PPF, done right, typically holds up for 5 to 7 years or longer indoors, well past the point where unprotected trim would already look tired. Interior surfaces don't face the UV load or temperature swings that exterior film absorbs, which is a big part of why the film lasts as long as it does.
Which Piano Black Surfaces Can You Protect?
Not every glossy panel in your car is a good PPF candidate, and knowing the difference saves you money on parts that don't need it and disappointment on parts that can't take it.
- Infotainment screens are the highest priority for most owners, since fingerprint smudges and scratches directly affect how usable the display is day to day.
- Center console tops and shifter surrounds take constant contact from hands, keys, and phones, making them the fastest surfaces to show visible wear.
- Door trim panels and armrest bezels get scuffed by rings, watches, and bag straps during entry and exit.
- B-pillar covers, common on Tesla models and several German sedans, benefit from film because they're glossy, visible, and awkward to polish once scratched.
- Textured plastics, matte trims, and panels with existing deep gouges are poor candidates. Film won't hide texture mismatches, and it can't fill in a scratch that's already cut into the plastic.
- Parts with glued-on trim strips or unusual adhesive layers need extra scrutiny, since film applied over an already-compromised bond can trap moisture or lift at the edges.
If you want the finished look to match factory gloss, confirm with your installer whether they're using a true gloss film or a satin variant. Applying a satin finish over a factory gloss panel changes the entire look of the dash, which is sometimes intentional and sometimes a costly mismatch.
Installation: What to Expect From Pros and DIYers
A proper interior PPF install follows a fairly consistent sequence, whether it happens in a shop bay or on your kitchen table with a pre-cut kit.
- Clean the surface thoroughly to remove oils, dust, and old wax residue that would interfere with adhesion.
- Polish if needed to remove light swirls before the film goes down, since film seals in whatever condition the surface is in when applied.
- Template or pre-cut the film to match the exact panel shape, either using digital templates or hand-trimming around a physical pattern.
- Wet-apply the film using a slip solution that lets the installer position it precisely before it grabs.
- Heat-conform the edges with a heat gun so the film wraps cleanly around curves and lip edges instead of bridging or lifting.
- Trim and seal the final edges so no lifted corner catches on a sleeve or a fingernail later.
The tools matter as much as the steps. A trained installer works with slip solution, a precision squeegee, hobby knives for edge trimming, a heat gun, and often digital cut templates matched to the exact trim shape of your vehicle. Skipping any of that shows up fast: edge lift within the first month, trapped air bubbles that never work themselves out, an orange-peel texture from overheating the film, or in rare cases interference with capacitive touch response on a screen if the film or adhesive isn't rated for it.
Pre-cut kits do exist for simpler, repeatable parts like B-pillar covers on certain Tesla models or Ford F-150 trim pieces, and a patient DIYer with a heat gun and steady hands can get a decent result on a flat panel. Compound curves, screens with sensitive touch layers, and consoles with multiple cutouts are a different story. That's where shop experience earns its cost.
Pro Tip: If you're on the fence about DIY, practice on a cheap piece of gloss black plastic from a hardware store first. Heat-forming film around a curve takes a feel you won't get right on the first try, and your dashboard is not the place to learn.
Preparation and Limitations: What Polishing Can and Can't Fix
Film is not a substitute for surface prep, and pretending otherwise is how installs go wrong. Light swirl marks and hairline scratches usually polish out completely with a machine polisher and the right compound, which means the film goes down over a clean, flawless surface and stays that way. Deep scratches, the kind you can catch with a fingernail, are a different problem entirely. Clear film sitting over a deep gouge just shows you a slightly glossier version of the same gouge.
A simple two-part test works before you commit to any install:
- Angled light check: hold the panel under a raking light source and look for scratches that catch the light at an angle but disappear when viewed straight on. Those usually polish out.
- Fingernail test: if your nail catches and drags in the scratch, polishing alone likely won't remove it, and you're looking at deeper correction or part replacement.
Reputable installers will test polish a small hidden section before committing to the whole panel. If a spot check removes the defect, the rest of the piece follows. If it doesn't, you're choosing between living with the flaw under film or replacing the part outright.
Cost, Packages, and How Long the Film Lasts
Pricing on interior PPF tracks pretty closely with piece complexity and labor time rather than material cost alone. A single infotainment screen typically runs $100 to $200, a center console with its curves and cutouts falls closer to $150 to $300, and a full interior package covering console, door trim, shifter surround, and screens generally lands between $400 and $800.
What actually drives that spread:
- Film grade, since premium urethane with better oleophobic coating costs more than basic protective film.
- Labor time, especially on pieces with tight radii, cutouts, or multiple angles that slow down precise trimming.
- Warranty terms, where longer manufacturer-backed coverage typically reflects a higher-tier film and installer confidence in the work.
On lifespan, interior film has a real advantage over exterior applications. It never fights UV degradation or road salt the way a hood or bumper does, so a well-installed piece routinely lasts 5 to 7 years or longer indoors, often outliving the owner's interest in the vehicle's other cosmetic details.
Maintenance: Cleaning, Self-Heal, and Warning Signs
Keeping PPF looking new is mostly about restraint. Skip the household glass cleaner and the stiff-bristle brush, both of which can dull the oleophobic topcoat over time.
- Clean with a pH-neutral soap and a soft microfiber towel, working in straight lines rather than circles.
- Rinse the towel frequently or use a two-bucket method so you're not grinding trapped grit back into the film.
- Trigger self-heal with gentle warmth, either parking in direct sun for an afternoon or using a heat gun on its lowest setting held several inches back, moving constantly.
- Avoid prolonged high heat near screens or electronics, since sustained hot spots can stress adhesives or components behind the panel, not just the film itself.
- Check edges monthly for lifting, debris trapped underneath, or any cloudiness that wasn't there at install, which can signal an adhesive problem starting to develop.
Pro Tip: A hairdryer on medium heat, held about six inches away and kept moving, works almost as well as a heat gun for minor swirl healing and carries a lot less risk of overheating a small area by accident.
How a Reputable Shop Evaluates and Guarantees the Work
Vetting an installer before you hand over a $60,000 EV dashboard matters more than most people think going in. A few concrete things to check before booking:
- Climate-controlled installation space. Dust and debris trapped under film during application cause permanent specks you'll see every time the sun hits the panel. A climate-controlled bay drastically cuts that risk.
- A real portfolio of interior work, not just exterior hoods and bumpers. Interior trim cutting and heat-forming is a different skill than wrapping a fender.
- Clear written warranty terms covering lifting, bubbling, and yellowing, with a defined timeframe rather than a vague verbal promise.
- Named film brands, since a shop that can't tell you what film they're using probably hasn't compared options either.
- Paint-correction capability in-house, so prep and film aren't handled by two disconnected vendors with no accountability between them.
When you're getting quotes, ask to see a sample piece finished with the film they're proposing, ask what prep work your specific panels will need based on their own inspection, and get a labor time estimate in writing. Templates, heat-forming technique, and edge-sealing are exactly the kind of detail work that separates a five-year install from a five-month one.
Compatibility Risks: Adhesion, Yellowing, and Texture Mismatch
Not every film and panel pairing goes smoothly, and knowing the failure modes ahead of time helps you avoid them.
Adhesion problems usually trace back to one of two causes: inadequate surface cleaning before application, or trim that's been treated with silicone-based dressings or aftermarket sealants that leave a residue film can't grip properly. If your dash has ever had a "trim shine" spray applied, tell your installer before they start, because that residue needs a specific cleaning step or the film will lift at the edges within weeks.
Yellowing is rarer with modern urethane than it was with older vinyl-based films, but it still happens, usually from cheap, low-grade film exposed to consistent heat near a windshield-adjacent panel. This is one of the clearer arguments for asking about film brand and grade during your quote rather than assuming all interior film performs the same.
Texture mismatch is a cosmetic risk rather than a functional one, but it's just as frustrating to live with. Applying a gloss film to a panel that was factory satin, or vice versa, changes how the whole dash reads visually, especially under interior lighting at night. A good installer will flag this before cutting anything, not after.
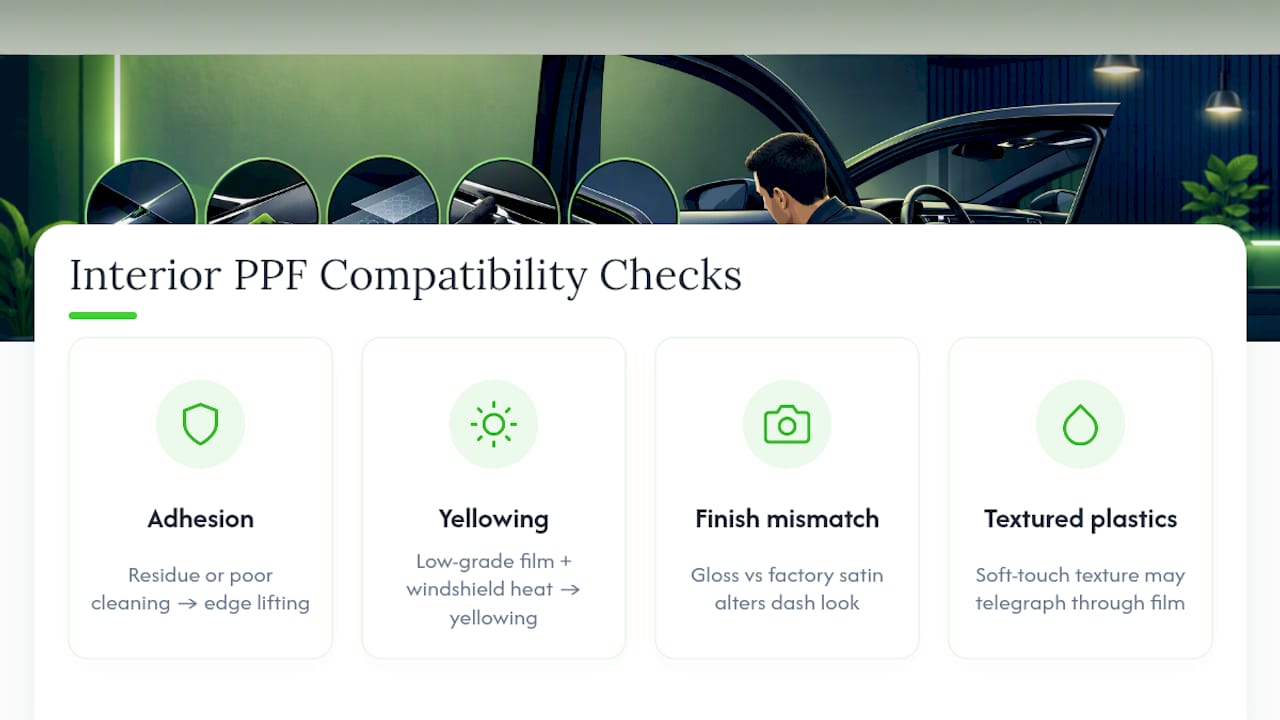
There's also a narrower risk with textured or soft-touch plastics that only look glossy under certain light. Film applied to a surface it wasn't designed for can telegraph the underlying texture through the clear layer, creating a slightly hazy or uneven look instead of the crisp gloss you were expecting.
PPF vs. Clear Coat Sprays and Vinyl Wraps for Piano Black Trim
Clear coat sprays marketed for interior trim promise a quick fix, and they do add some scratch resistance for a short window. The problem is durability: most spray coatings wear thin within months of regular contact, and once they start breaking down unevenly, they can actually make swirls more visible by catching light differently across the panel. There's also no self-healing mechanism, so once a spray coating scratches, that's permanent until you strip and reapply it.
Vinyl wraps sit closer to PPF in durability but solve a different problem. Wraps are primarily a color or finish change, useful if you want to convert a satin panel to gloss black or add a completely different texture. They're generally not built with the same optical clarity or touch sensitivity that screens require, and most vinyl products lack the self-healing polymer structure that urethane PPF relies on. For a full comparison of the two approaches, the short version is that PPF protects while staying invisible, and vinyl wraps change appearance while offering some incidental protection along the way.
For piano black trim specifically, where the entire goal is preserving an existing gloss finish and keeping a touchscreen fully responsive, urethane PPF with proper self-healing properties remains the option built for that exact job, offering better durability than either alternative according to comparisons of piano black protection methods.
Spotting Real Piano Black Trim vs. Synthetic Look-Alikes
Not everything that looks like piano black actually is piano black, and applying film to the wrong material wastes money and sometimes damages the panel. Genuine piano black trim is typically a cast or injection-molded acrylic or polycarbonate piece with a true high-gloss finish baked into the material itself. It feels hard and slightly cool to the touch, and a light tap produces a solid, almost glassy sound.
Synthetic imitations, often used on lower trim packages, are frequently a textured plastic base with a glossy film or paint layer applied over top to mimic the look. These surfaces often feel slightly softer, show a more plastic-sounding tap, and, critically, may already have a factory-applied protective layer that PPF won't bond to reliably.
A simple way to check before committing to film: examine the edge of the panel where it meets another trim piece, often around a vent surround or console lip. Genuine piano black usually shows a clean, uniform material edge. Imitations sometimes reveal a different base color or texture peeking out at the seam, a giveaway that the glossy surface is a coating rather than the material itself. When in doubt, ask your installer to test a hidden section, the same way you'd test for scratch removal before polishing, since adhesion behaves differently on a true gloss substrate versus a coated one.
When PPF Fails: Signs, Repairs, and Replacement
Even good film eventually shows its age, and knowing the warning signs early keeps a small problem from becoming an expensive one. Watch for edge lifting, usually starting at a corner or seam where the film was trimmed close to another panel. Once an edge lifts, dust and moisture work their way underneath, and the problem spreads rather than staying contained.
Cloudiness or a slight haze across a section of film, especially one that used to heal cleanly with heat, often signals the polymer has finally exceeded its self-healing capacity. At that point, mild heat won't restore clarity, and the film needs replacement rather than another round of heat treatment. Yellowing, discussed earlier as a compatibility risk with lower-grade film, is another clear replacement trigger since it can't be reversed with cleaning or heat.
Small, isolated edge lifts can sometimes be repaired by a shop reheating and resealing just that section, provided the film underneath hasn't yellowed or become brittle. Full replacement makes more sense once multiple areas show lifting, once cloudiness spreads across a visible section, or once the film has simply hit the end of its expected service life. Given that a properly installed piece often runs 5 to 7 years or more, replacement is usually a planned decision rather than an emergency one, giving you time to shop for updated film options rather than scrambling.
When Interior PPF Is Worth the Investment
If you care about keeping a showroom-quality interior, interior PPF earns its keep. It's the one solution that actually prevents the damage instead of just hiding it after the fact, and that distinction matters more with piano black than almost any other interior material.
My practical advice: inspect your most visible and most-touched pieces first, the screen and console usually, and get quotes specifically for those before considering a full interior package. Insist on seeing prep work included in the quote and get warranty terms in writing.
On DIY versus professional installation, simple flat pieces are fair game for a patient owner with the right tools. Anything with a screen, a curve, or a cutout is where professional experience consistently produces a cleaner, longer-lasting result.
— Jake
Get Your Piano Black Trim Protected the Right Way
A professional shop installs paint protection film, interior and exterior, inside a climate-controlled facility built specifically to keep dust and debris out of the equation during application. That matters more on interior work than most people realize, since a single trapped particle under film on a console or screen is permanent and visible every time the light hits it.
The shop's PPF service covers everything from single-piece protection on a shifter surround to full interior packages, backed by manufacturer-authorized warranties. Tesla and EV owners get particular attention from some providers, since screen and console geometry on those platforms tends to be more complex than traditional dashboards, and getting the fit wrong risks touch-response issues down the line. During a quote, expect an inspection of specific trim pieces, an assessment of whether polishing is needed first, and a labor estimate before any film gets cut.
If your piano black trim is already showing swirls, or you just want to get ahead of it on a new vehicle, book an estimate and find out what protecting your highest-touch interior pieces actually costs.
Sources
For more technical background, see the interior PPF pricing and lifespan guide, real-world owner results after 3,000+ miles, and a technical breakdown of PPF on soft black trim.
- Interior PPF for Piano Black Trim | Stop Scratches
FAQ
How Do You Get Rid of Scratches on Piano Black Trim?
Light swirls often buff out with a machine polisher and a plastic-safe compound, but the fix is temporary since the bare plastic scratches again quickly. For a lasting solution, interior PPF applied after polishing prevents new scratches from forming in the first place.
What Is the Difference Between Gloss Black and Piano Black?
"Gloss black" is a broad term covering any high-shine black surface, while piano black specifically refers to the deep, mirror-like automotive interior finish resembling a lacquered piano. Piano black is typically a more refined, higher-clarity gloss than generic gloss black plastic trim.
Can You Get PPF in Black?
Yes, tinted or black PPF exists for both interior and exterior applications, and it's often marketed as piano black PPF for trim pieces where a deeper, richer gloss look is desired. These films combine TPU-based protection with the piano black aesthetic rather than relying on clear film alone.
Can Piano Black Plastic Be Polished?
Yes, light surface scratches and swirl marks on piano black plastic generally respond well to machine polishing with a plastic-appropriate compound. Deep scratches that catch a fingernail usually won't polish out completely, and those panels are better candidates for PPF over a corrected surface or outright replacement.