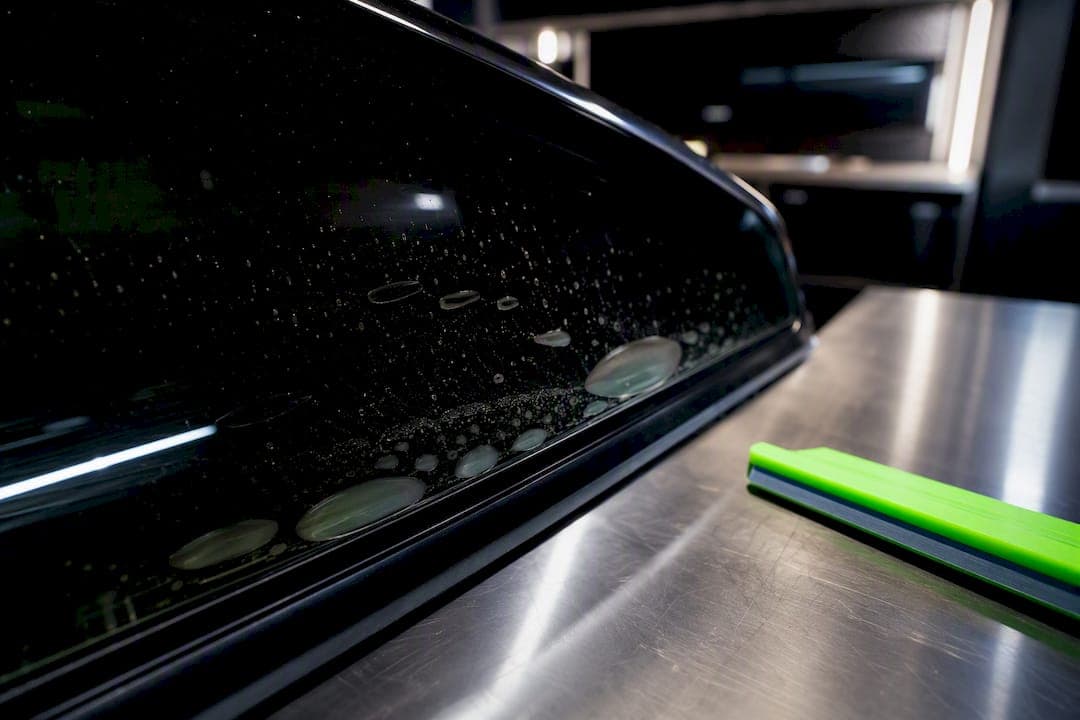
Most tint bubbles fall into two camps: water vapor still curing under the film, or adhesive that has already failed. If bubbles showed up right after installation and look hazy or shift over a few days, give them the normal curing window and monitor. If they're sharp, unmoving, or appear weeks later, that's an installation or adhesive problem, and it calls for a professional look.
TL;DR:
- Water vapor bubbles after tint installation are normal and usually disappear within 3 to 14 days, especially in warm, dry conditions.
- Persistent, firm, or unmoving bubbles appearing weeks later indicate adhesive failure or improper installation that likely requires professional reapplication.
- Dust speck bubbles remain static and show no signs of growth or shrinkage, signifying trapped particles during the initial install.
- Quality of materials and environment controls, such as dust-free facilities and high-grade films, significantly reduce the risk of bubbling and adhesive breakdown over time.
- Waiting beyond the curing period or attempting DIY fixes like puncturing bubbles often worsens the issue, making professional inspection or reinstallation necessary.
Table of Contents
- Tint Bubbling Causes: The Three Types You'll See
- What Actually Causes Bubbles To Form?
- How Long Does It Take Tint Bubbles To Go Away?
- What Prevents Tint From Bubbling In The First Place?
- Can You Pop Or Fix Tint Bubbles Yourself?
- Signs You Need Full Tint Replacement
- What Separates A Reliable Tint Job From A Risky One
- Why Most Tint Bubbling Advice Misses The Point
- Get Your Tint Checked Or Redone The Right Way
- Sources
- FAQ
Tint Bubbling Causes: The Three Types You'll See
Not every bubble means the same thing, and learning to tell them apart saves you a wasted trip to the shop, or worse, an ignored problem that gets expensive.
- Water or moisture bubbles. These look cloudy or milky right after install, often scattered across the glass. They typically shrink or vanish entirely as the water trapped between the film and adhesive evaporates through the film. This is the most common reason people search for tint bubbling causes in the first place, and it's usually nothing to worry about.
- Air or adhesive bubbles. These are firmer, more defined, and don't move or shrink over time. They tend to grow instead. Air bubbles that are sharp and persistent usually point to installation errors or adhesive failure, and they don't resolve on their own.
- Dust-speck bubbles. Tiny, static imperfections caused by a particle trapped under the film during install. They don't grow, don't shrink, and stay exactly where they started.
What Actually Causes Bubbles To Form?
Bubbling almost always traces back to one of five root problems, and knowing which one you're dealing with tells you whether you're looking at a curing hiccup or a redo.
- Surface contamination. Oil, old adhesive residue, or dust on the glass keeps new adhesive from bonding evenly. Contamination is one of the most frequent causes of bubbles, which is why reputable shops run multi-stage glass cleaning before film ever touches the window.
- Installation technique errors. Insufficient squeegeeing leaves trapped mounting solution under the film. Rushed edge work skips proper tucking into the window channel, and poor edge tucking during install is a common origin point for later peeling and bubbling.
- Material quality. Cheap dyed films paired with weak adhesives break down faster than ceramic or carbon film. Lower-grade dyed films and weaker adhesives degrade faster under UV and heat, leading to bubbling and discoloration over months or years rather than days.
- Environmental and aging factors. Repeated heat and cold cycling stresses the adhesive bond over time, and UV exposure accelerates that breakdown, especially on south-facing windows that bake in direct sun for years.
- Window-specific challenges. Defroster lines, curved rear glass, and dot-matrix borders all raise the difficulty of a clean install. Film has to stretch around curves and work around printed elements without trapping air, which is part of why tinting near a dot-matrix edge takes more skill than a flat door window.
How Long Does It Take Tint Bubbles To Go Away?
Curing bubbles typically clear up within roughly 3 to 14 days, depending on temperature and humidity. Warmer weather speeds the process because heat helps push moisture out through the film faster; cold, damp conditions stretch it out.
Quick diagnostic check: Water bubbles shrink, shift, or vanish as days pass and often cluster near the edges. Adhesive-failure bubbles stay put, feel firmer, and sometimes expand. If nothing has changed after two weeks, treat it as a failure, not a cure.
A few things to keep in mind during that window:
- Park in direct sunlight if possible, as heat accelerates curing, while cooler environments slow it down.
- Don't roll your windows down. Installers commonly recommend waiting 3 to 5 days before operating them, since a window dropping into its channel too early can crease or lift a freshly applied edge.
- Skip washing the tinted windows until the curing period passes.
- If bubbles appear brand new weeks or months after install, with no history of bubbling before, that's adhesive breakdown, not moisture.
What Prevents Tint From Bubbling In The First Place?
Prevention comes down to controlling three variables: the environment, the material, and what happens in the days right after install.
On the installer's side, a climate-controlled, dust-reduced space matters more than most people realize. Shop-controlled environments with lint-free tools measurably cut down on dust-speck bubbles and produce more consistent cures. Multi-pass glass prep, correct squeegee pressure, and removing door panels for full edge access on defroster-equipped or curved rear windows all reduce the odds of trapped air or missed contamination.
Material choice matters just as much. Ceramic and carbon films hold up better against UV and heat than cheap dyed alternatives, which is why asking about warranty coverage before you commit is worth the extra five minutes. A clear ceramic film option is also worth asking about if you want UV protection without a heavy tint look.
On your end after install:
- Wait out the full curing period before rolling windows down or hitting a car wash.
- Clean tinted glass only with ammonia-free products and a soft cloth. A streak-free glass cleaning method built around gentle, non-abrasive products works well on tint.
- Give extra attention to defroster-line and curved rear windows. They're the most likely spots for early bubbling because of the added install complexity.
Pro Tip: If you're unsure whether your car's curing time is normal, check how the bubbles look at the two-week mark, not the two-day mark. Most legitimate curing issues resolve well before then.
Can You Pop Or Fix Tint Bubbles Yourself?
Puncturing a bubble with a pin or blasting it with a hair dryer might seem like a quick fix, but these home remedies often make things worse by tearing the film or accelerating delamination around the puncture site. Once you poke a hole, there's no undoing it.
If the bubbles are still in the curing window and hazy or shifting, the right move is to leave them alone. Small water bubbles clear up on their own; interfering with them just risks damage that wasn't there before.
For bubbles that are clearly adhesive failure, here's what a professional shop actually does:
- Re-squeegees the affected area and re-tucks the edges, if the adhesive underneath is still workable.
- Fully removes and reinstalls the film if the adhesive has broken down, since partial fixes on failed adhesive rarely hold.
- Inspects surrounding areas for early signs of the same failure, particularly around defroster lines, where removal carries its own risk if done incorrectly.
Whether you're looking at a repair or a full reinstall usually comes down to timing: right after install, a re-squeegee often solves it; months later, you're probably looking at a redo.
Signs You Need Full Tint Replacement
Some signs mean patching is off the table. Discoloration, a hazy or purple tint, delamination along the edges, or widespread air pockets that keep spreading all point to adhesive that has given out for good. Once film shows discoloration or widespread bubbling from adhesive failure, cleaning or spot fixes rarely restore it, and replacement becomes the only real option.
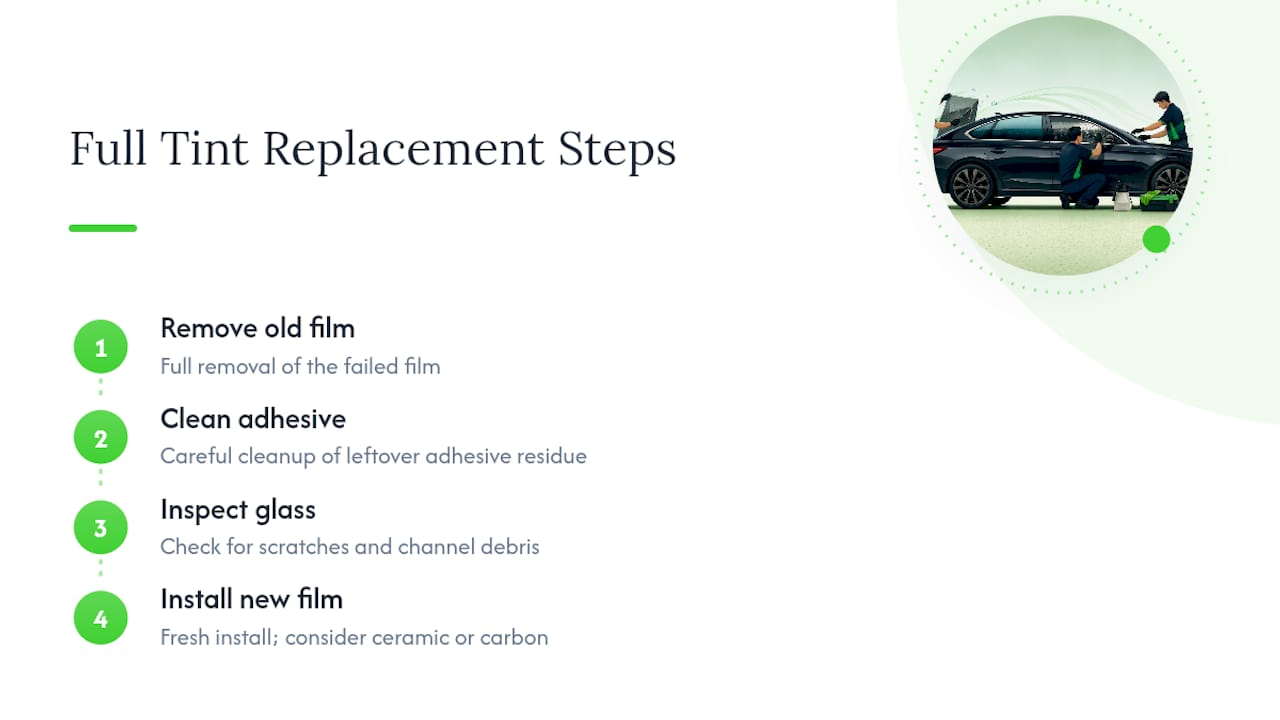
Replacement follows a fairly predictable path: full removal of the old film, careful cleanup of leftover adhesive residue, a glass inspection for scratches or channel debris, and then a fresh install with new film. Upgrading to ceramic or carbon at that point is worth considering. It costs more upfront but holds up longer against the heat and UV exposure that caused the original failure.
What Separates A Reliable Tint Job From A Risky One
A climate-controlled install bay isn't a luxury detail, it's a functional advantage. Less airborne dust means fewer trapped specks, and stable temperature means more consistent adhesive cure. Before you book anywhere, ask two direct questions: what warranty backs the film against bubbling or discoloration, and can they show photos of past installs. Tint & Wraps Customs performs every install in a climate-controlled facility in Van Nuys and backs its work with manufacturer warranties, the kind of verifiable detail worth asking any shop for.
Why Most Tint Bubbling Advice Misses The Point
The conventional advice on tint bubbling treats every bubble the same way: wait it out, it'll probably fix itself. That's true often enough to be dangerous, because it trains car owners to ignore the cases where waiting actually makes things worse.
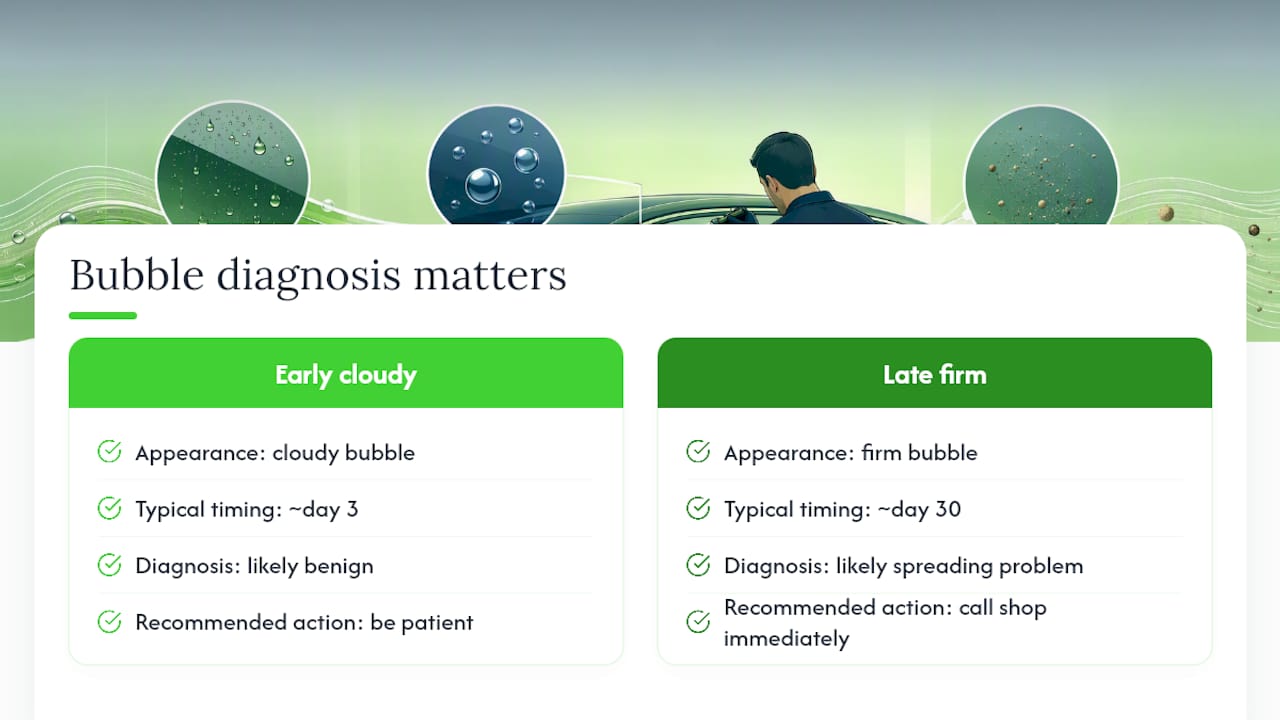
Here's what the research on this actually supports: the diagnosis matters more than the timeline. A cloudy bubble at day three and a firm bubble at day thirty look similar to an untrained eye, but they demand opposite responses. One needs patience. The other needs a phone call before it spreads across the whole panel.
What gets underrated is how much of this traces back to the install itself, not bad luck or a defective roll of film. Contamination, rushed squeegee work, and skipped edge-tucking are process failures, and they show up on a delay. If you want to avoid this conversation entirely, the fix isn't a better cleaning routine after the fact. It's picking a shop that controls the environment before the film ever touches your glass. That's the piece most guides skip, because it's not something you can fix once bubbles are already there.
— Jake
Get Your Tint Checked Or Redone The Right Way
Tint & Wraps Customs is the shop to call when a curing bubble turns out to be something more, or when it's just time for a clean reinstall. Every job, from tint removal to ceramic and carbon film installation, happens inside a climate-controlled facility in Van Nuys built to eliminate the dust and temperature swings that cause bubbling in the first place.

If your tint has bubbles that haven't budged in two weeks, don't guess. Book an inspection through the window tinting and tint removal page and get a straight answer on whether it's a quick fix or a full redo. Manufacturer-backed warranties come standard on new installs, so you're covered well past the day you drive off the lot.
Sources
This guide draws on installer research covering curing timelines, adhesive failure, and contamination-driven bubbling, along with guidance on DIY repair risks and material quality.
- Why Does My Car Window Tint have Bubbles? 5 Easy Ways to Fix It
- Window Tint Bubbles: When They Go Away & When They Won't
- Car Window Tint Bubbles: Causes and How to Prevent
- Why Is My Window Tint Bubbling? Causes and Whether Can Be Fixed
FAQ
How Can I Fix Bubbling Tint?
If the bubbles are hazy and appeared right after install, leave them alone and let them cure. If they're firm, sharp, or showed up weeks later, they need professional re-squeegeeing or a full reinstall, not a DIY fix.
Is It Normal For My Tint To Have Bubbles?
Yes, small water bubbles right after installation are normal and expected as trapped moisture works its way out through the film.
How Long Does It Take For Window Tint To Stop Bubbling?
Curing bubbles usually clear up within 3 to 14 days, with warmer weather speeding up the process and cold, damp conditions slowing it down.
How Can I Tell If I Got A Bad Tint Job?
Watch for bubbles that don't shrink after two weeks, edges that lift or peel, or discoloration developing over time. All three point to installation or adhesive problems rather than normal curing.
Does Tintandwrapscustoms Offer Tint Removal If My Old Film Failed?
Yes, tint removal is a common service offered alongside carbon and ceramic tint installation, typically performed in climate-controlled facilities.