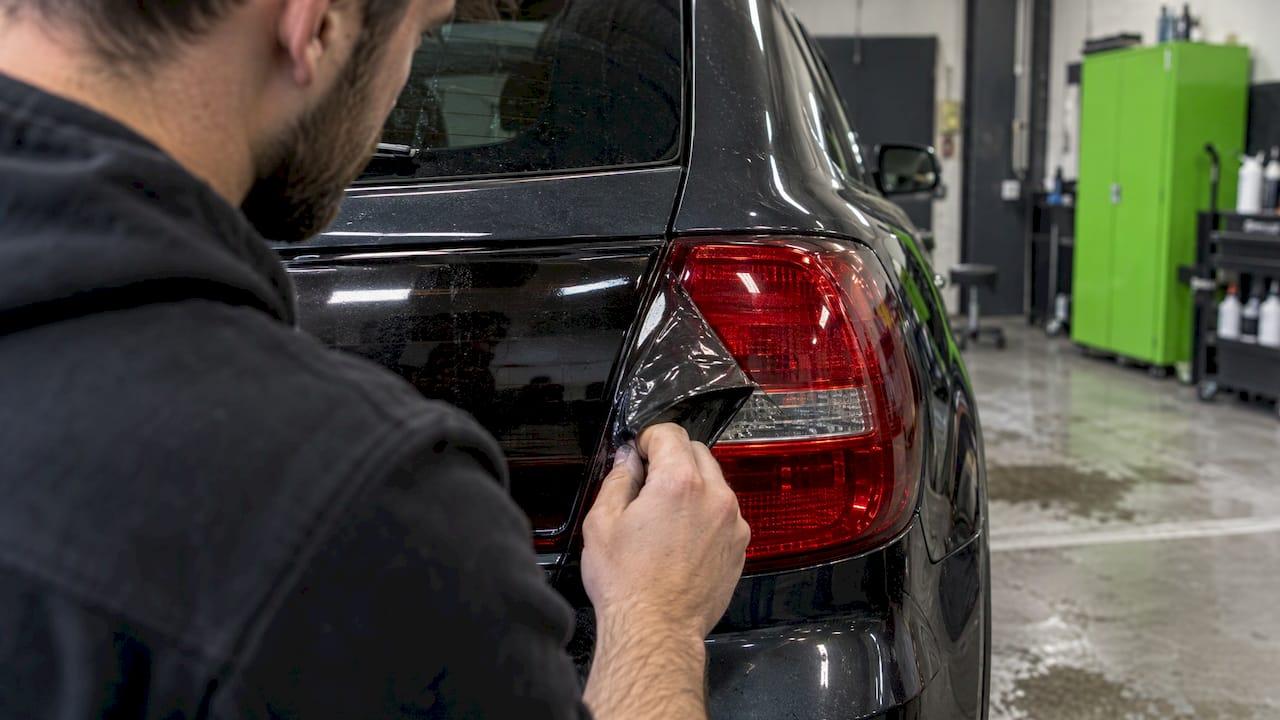
Taillight tint comes off safely when you match the method to the type. Film peels off after gentle heat and a slow pull. Spray tint is paint, and it takes solvents or wet sanding that can haze the lens. Work out which one you have first, because that decides whether this is a 30-minute job or one for a professional.
This guide covers how to identify the tint, how to peel film, how to clear leftover glue, what to do with spray, which products can damage the lens, and when to stop.
TL;DR
- Film tint is the easy case: warm it, lift a corner with plastic, pull slowly at a low angle, then clean off the adhesive.
- Spray tint is a coating. It needs solvent or fine wet sanding, and a wrong move can leave the lens frosted.
- Skip acetone, WD-40 and metal blades on taillight plastic. Isopropyl alcohol or a plastic-safe adhesive remover is the safer choice.
- Fine cracks or a cloudy lens after removal can't be polished out. Stop there and get the lens checked.
- If you would rather not risk your lights, our headlight and taillight team in Van Nuys can handle it.
Table of Contents
- First, work out what is on your taillights
- What you need before you start
- How to remove taillight tint film
- Clearing adhesive residue
- Removing spray tint
- Products and tools that damage taillights
- When to stop and get help
- Getting your lights done properly in Van Nuys
- FAQ
- Sources
First, work out what is on your taillights
The two common types look similar from a few feet away, but they behave very differently when you try to take them off.
Film tint is a thin, self-adhesive smoked vinyl laid over the lens. Film made for lights is generally sold as removable. The seller Rvinyl describes it as fully reversible and removable without harming the lens surface.
Spray tint is a transparent dark paint or coating. It becomes part of the surface, which is why it is far harder to reverse. Plasti Dip-style rubber coatings sit in between: they are designed to peel, but they often lift at the edges and look matte.
A few quick checks on your own car:
- Look at the edges. A film has a visible edge or seam, sometimes with tiny lifted corners or bubbles. Spray has no edge, just a color that runs into the trim.
- Look for texture. Spray often shows orange peel, drips or dust specks. Film is flat and uniform.
- Try a corner. Press a fingernail at the edge of the lens or a corner. If something lifts, it is film.
- Check the paperwork. If you bought the car used, look at the listing or ask the seller. Unknown spray is the riskiest case.
Still unsure? Treat it as spray until proven otherwise. That keeps you from reaching for a razor blade on paint.
What you need before you start
Gather the kit first so you are not improvising halfway through with the wrong product.
- A hair dryer (a heat gun only if you keep it moving, see below)
- Plastic razor blades or a plastic trim tool
- Isopropyl alcohol or a plastic-safe adhesive remover
- Clean microfiber towels
- Painter's tape to protect the paint and trim
- Gloves, and safety glasses if you are using solvents
A list from Fat Boys Off Road for lamp tint removal covers the same basics: heat source, plastic scrapers, adhesive remover, rubbing alcohol, microfiber, and eye and hand protection. It also says to work somewhere well ventilated because solvent fumes build up.
Pick a shaded spot or a garage. Park the car so the lights are cool to the touch. Working on a lamp that has just been on makes the plastic soft and the adhesive messy.
How to remove taillight tint film
This is the method most guides agree on, and it is gentle on the lens.
- Tape the surroundings. Mask the body panel and trim next to the lamp.
- Warm the film. Hold a hair dryer a few inches away for about a minute, moving across the lens. You want the adhesive soft, not the plastic hot.
- Lift one corner. Use a fingernail or a plastic tool. Never use a metal blade, which scratches polycarbonate and acrylic quickly.
- Pull slowly at a low angle. Fold the film back on itself and keep it close to the surface rather than pulling straight up. Re-warm any section that resists.
- Work in sections. If the film tears, warm the edge again and start a new corner.
- Clean up. Once the film is off, deal with the adhesive (next section).
The same sequence is described by Rvinyl: gently heat an edge, peel slowly at a low angle, then clean residue with isopropyl alcohol or a dedicated adhesive remover.
A note on heat guns
A heat gun gets hot enough to warp a lens and blister nearby paint. If you use one, Fat Boys Off Road advises keeping it moving at a safe distance. A hair dryer is slower but much more forgiving, and for most film it is enough.
Clearing adhesive residue
After the film comes off, a hazy, slightly tacky patch is usually leftover glue, not damage to the lens. You can check:
- Run a clean fingertip over the hazy area. Glue feels sticky or slightly rough.
- Put a little plastic-safe adhesive remover on a cloth and rub one small corner.
- If the haze lifts and the surface feels smooth, it was adhesive. Clean the whole lens with the same product.
This spot check is the approach laid out by BoltWiki. Apply the product to the cloth rather than flooding the lens, rub in small circles, and swap to a fresh part of the towel often so you aren't smearing glue back on.
Isopropyl alcohol is the standard first choice. Be aware that Audi's technical service bulletin MC-11003026-0001 warns that cleaners with a high alcohol content can penetrate taillight plastic and lead to cracks. So keep contact brief, wipe it off, and don't leave soaked cloths sitting on the lens. If you are unsure, start with a plastic-safe adhesive remover and spot test it first.

Removing spray tint
This is where most problems happen. Sprayed tint is paint, so removal means dissolving or abrading it, and both can harm the lens underneath. The maker of VHT Nite-Shades itself warns on its product that once applied to a plastic lens it cannot be satisfactorily removed, as quoted by Headlight Armor. Go in knowing that results vary.
Start with the gentlest option
If the coating is a lens tint such as Rust-Oleum's, the manufacturer's support page says isopropyl alcohol removes it and is not expected to damage the lens, but it still suggests a spot test before doing the whole lens. Try this first on a hidden corner.
If that doesn't work
Stronger solvents are the next step, and the steps from Fat Boys Off Road are a sensible template:
- Clean and mask the area.
- Choose a solvent and test it on a small hidden spot first.
- Put the solvent on a cloth, never pour it onto the lens.
- Wipe gently and use a plastic scraper on softened paint.
- Rinse often with water to neutralize the solvent.
- Repeat in small sections.
Strong solvents such as acetone are the risky end of this range. Several guides say acetone can melt or craze plastic lenses, so only a hidden-spot test can tell you how your lens reacts. If the lens looks dull, soft or cloudy in the test, stop there.
Wet sanding is the last resort
When solvents fail, very fine wet sanding (around 2000 to 3000 grit with plenty of water) followed by a lens restoration kit may be needed, according to Fat Boys Off Road. The same source warns that bad sanding can permanently damage the lens. Taillights are also a poor fit for polishing: the Audi bulletin cited above says polishing attacks the outer layer of the lens.
If you do restore the surface, use a kit made for the job. 3M's Quick and Easy kit is designed for plastic lenses including taillights, with a fine refining disc and clear coat wipes.
Products and tools that damage taillights
| Avoid | Why |
|---|---|
| Acetone, paint thinner, bleach | Strong solvents can damage the surface and leave cloudy marks on plastic lights |
| Metal razor blades | Scratch the lens; use plastic blades or a trim tool instead |
| Abrasive scrub pads | Leave scuffs and haze |
| WD-40 Multi-Use Product | WD-40 says to avoid it on polycarbonate such as lens plastics |
| A heat gun held in one spot | Can melt the lens and damage nearby paint |
The WD-40 question comes up a lot because it is already in most garages. Its own technical data sheet says clear polycarbonate may stress craze or crack on exposure and advises testing surfaces first. A plastic-safe adhesive remover is a better fit for lens plastics.
When to stop and get help
Stop and reassess if you see any of these:
- A frosted or milky lens that does not clear when you wipe it with remover.
- Fine spiderweb cracks (crazing) or a visible crack.
- Spray tint that smears and doesn't dissolve after a spot test.
- Moisture inside the lamp.
BoltWiki notes that a badly crazed or cracked lens can't be fixed by polishing and the lens or assembly should be replaced, with the housing checked for water first. Better to catch that early than keep scrubbing.
Buying a used car with spray-tinted lights? Weigh that before you agree on a price. Removal can go wrong, and replacement lights are part of the real cost.
Perspective from the shop
We see taillight tint from both sides: lights we darken, and lights people want back to stock. The pattern is consistent. Film behaves the way it is meant to. Heat it, peel it slowly, clean the glue, and the lens is fine. Trouble starts when the coating is spray, or when someone reaches for the wrong chemical on a lens that was never built to take it.
That is why we do our installs in a climate-controlled, dust-free facility and why we favor film for lights. A film finish is uniform, and it is designed to be taken off cleanly when you want a change. If you plan to sell the car or want to switch looks later, that matters.
Our approach to tint, whether it is on glass or lights, is to keep the work reversible and the finish clean. If you already have tint on your lights and you are not sure what it is, bring the car by. It is better to have someone look at it than to find out with a bottle of acetone.
Jake
Getting your lights done properly in Van Nuys
If your lights are tinted with something you can't identify, or you want fresh smoked lights without the risk of a failed DIY, our headlight and taillight tinting service is built for exactly this. We work in a climate-controlled facility, and we handle everything from glass to lamps for drivers across the San Fernando Valley, including Tesla and other EVs.
Our offers don't have a published price online, so reach out through the site with your vehicle and what is currently on the lights, and we will tell you what to expect. If your project is window tint rather than lights, our window tint removal page covers that work, and our guide on avoiding defroster damage during tint removal explains why rear glass needs extra care.
Thinking about the next step after removal? Clear headlight PPF is one way to protect lenses without changing how they look.
FAQ
Can I remove taillight tint with a hair dryer?
Yes, if it is film. Warm the film for about a minute, lift a corner with a fingernail or plastic tool, and pull slowly at a low angle. A hair dryer is gentler than a heat gun, though you may need to re-warm stubborn spots. It will not dissolve spray tint.
Does WD-40 remove tint glue from taillights?
It is not a good idea on lens plastic. WD-40's own guidance says to avoid its Multi-Use Product on polycarbonate such as headlight lenses. Use isopropyl alcohol or a plastic-safe adhesive remover, spot tested first.
Is acetone safe for taillight tint removal?
Generally no. It can damage plastic lenses and leave them cloudy. Some spray tint removal guides include it as a last-resort solvent, but only on a cloth, after a hidden-spot test, and with frequent water rinsing. For film, you never need it.
What if my taillight is hazy after taking the tint off?
First check whether it is leftover adhesive: rub a small corner with a plastic-safe adhesive remover and see if the haze lifts. If the surface is crazed, cracked or frosted and nothing clears it, polishing won't fix it and the lens may need replacing.
Can a shop remove spray tint from my taillights?
A professional can assess what the coating is and how the lens will respond before anything is done. Bring the car in so we can look at it. We offer headlight and taillight tinting at our Van Nuys shop, and you can reach us through our site.
Sources
- Rvinyl: Tail Light Tint collection
- Fat Boys Off Road: How To Remove Headlight Tint
- BoltWiki: Smudged Tail Light After Removing Tint
- Audi Technical Service Bulletin MC-11003026-0001
- Headlight Armor: What About Headlight Spray Tint?
- Rust-Oleum Support: How to Remove Lens Tint
- 3M Quick and Easy Headlight Restoration Kit 39193
- Teckwrap: How to Remove Headlight Tint Without A Heat Gun
- WD-40: What WD-40 Multi-Use Product Is Safe On
- WD-40 Technical Data Sheet